Teams

Teams is a groupware, where you make collaborative groups, work on projects, chat, share files or have meetings.
Teams is included in the Microsoft 365 (Office) software package. Teams can also be downloaded on its own or accessed through a browser by going to teams.hi.is.
Under "Chat" you can chat with one or more people that do not have or need a whole Team around it. If there already is a group around the project you want to chat about or if you want to send a query to your departments group it is better to go directly to that group chat under "Teams".
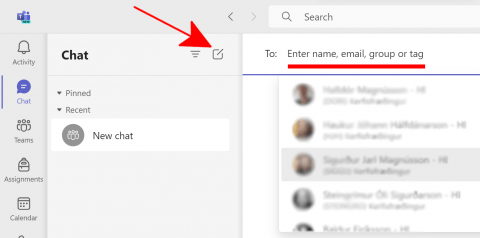
Click "Chat" on the left side menu. Click the pencil and paper at the top. You can start writing the names of people you want to chat with and choose the name when it appears in the drop down menu:
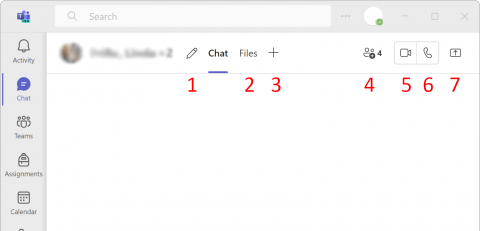
In the chat you can:
- Name the chat.
- Share files and see files that have been shared to the chat.
- Add new tabs and extensions to the chat.
- Add more people to the chat.
- Video chat.
- Call.
- Share your screen.
Teams is among other things used for video conferencing. You can video chat with multiple people at a time, you can quickly invite a whole team or you can invite each individual.
When video conferencing with people outside of the university you will need to write their entire email address in the meeting invite and then admit them once they join the meeting (see step 12 & 13).
First you'll invite people to the meeting, you can either do that from Teams or from Outlook. Here we'll go through how to book a meeting in Teams.
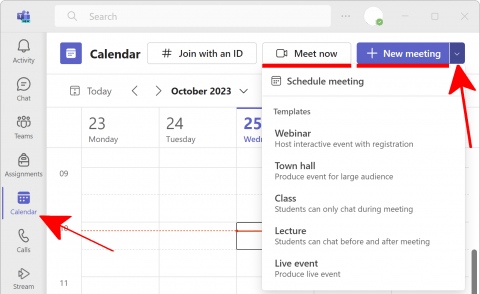
- Click on "Calendar" and then "New meeting“ if you want to book a meeting. You can also click "Meet now" if you want to start a meeting immediately. If you click on the arrow you will see templates that you can use for meetings:
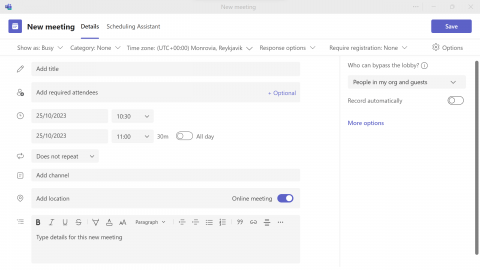
- You will get the "New meeting" window.
- In "Add title" give the meeting a name.
- Under "Add required attendees" you add people that are required to be in the meeting by putting their name or email.
- Under "+Optional" you can add people that can also join the meeting.
- Choose a date to start and end the meeting, you can click „Scheduling assistant“ above to see when everyone in is available.
- Click "Does not repeat" if you want repeated meetings.
- If you want to invite people from a specific channel to the meeting you can choose the group as a whole under "Add channel". The invitation will be visible on the channel but will also be sent to each person via email and added to their calendar.
- If the meeting is to take place in a meeting room choose the room under "Add location" so the room will be booked.
- Put a better description of the meeting in "Type details" for this new meeting if needed.
- Under "Options" you can choose to record the meeting.
- Finally click "Save" to send the meeting invitation.
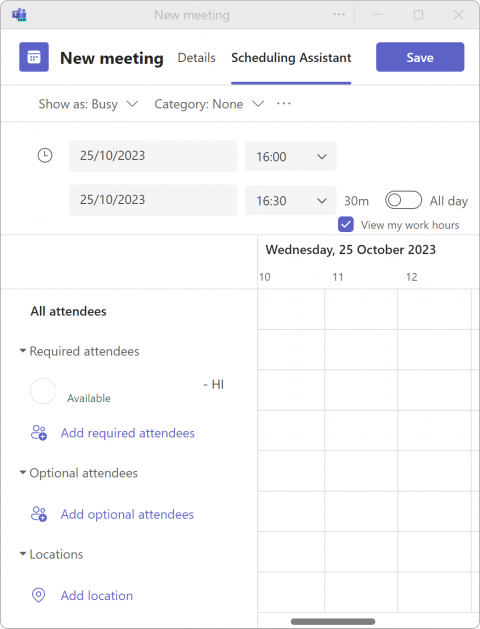
- In "Scheduling assistant" you can see when meeting guests are available and meeting rooms are free. Add them under "Add attendees" if you hadn't already in previous steps. Choose a time that suits everyone, you can drag the column to change the time or widen it to extend the meeting:
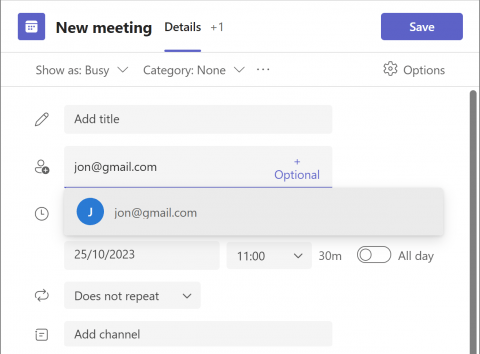
- To invite people from the University write their name or email and they should appear on the drop down menu, choose them. For people outside of the University write their full email address and select the email.
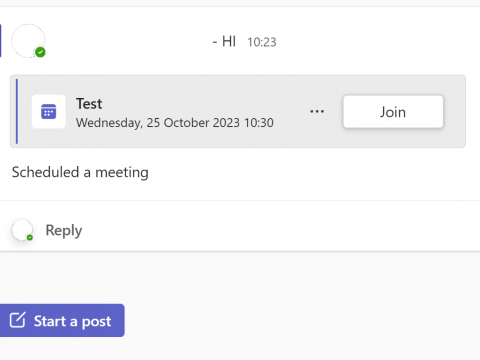
- Here you see how the meeting invitation appears on the channel. If no channel was selected the invitation will only be sent via email (step 10) and appear on calendar. You click on the "Join" to partake in the meeting:
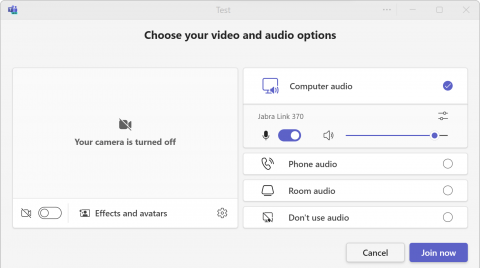
- Choose „Join now“ to open the meeting:
- The meeting window will appear. Your video will be in the bottom right corner and other members are distributed over the screen:
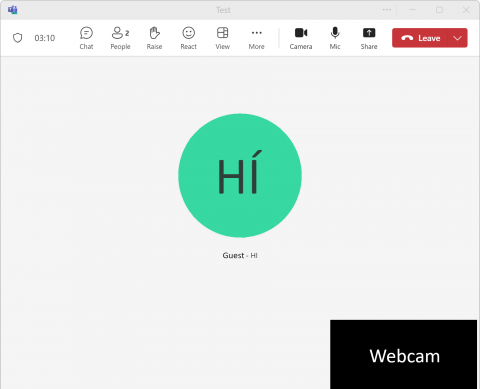
- While the meeting is ongoing you'll have some settings:
- Chat: Here you can write messages and see notifications for the chat.
- People: Here you can see who is in the meeting and add more people to it.
- Raise: If you got a question or if you want to add something to the conversation you can raise your hand.
- React: React with emoji's.
- View: Change the layout of the meeting
- Rooms: Seperate people into meeting rooms.
- Apps: Add extensions (apps) to the meeting room (this option may not work).
- Camera: Turn the camera off or on. You can also select which camera to use.
- Mic: Turn the mic off or on.
- Share: Share your screen, desktop or a specific window on your computer.
- Leave: Leave the meeting.
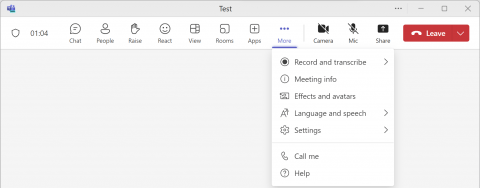
- More settings can be found under "...More":
- Record and transcribe: You can record the meeting, other members will get a notification that the meeting is being recorded and that participation means you agree to the recording. To stop recording click again. The recording is saved under recordings in the general channel.
- Meeting info: General information about the meeting
- Effects and avatars: You can blur the background if your environment is disturbing or there is something you don't want others to see.
- Language and speech: Here you can turn on captions for the meeting. Icelandic is not supported.
- Settings: Here you can find various settings for the meeting.
- Call me: Call yourself and use your phone as a microphone.
- Help: Here you can find various information for Teams by Microsoft.
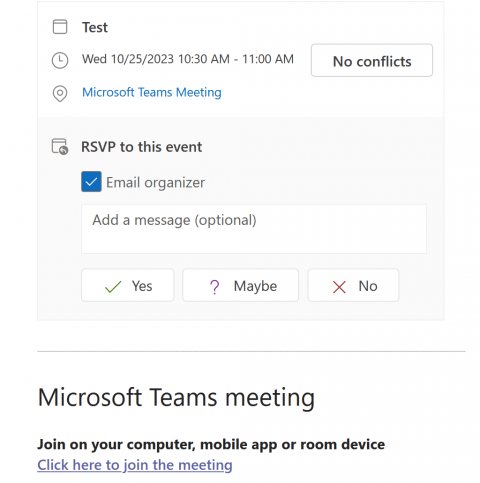
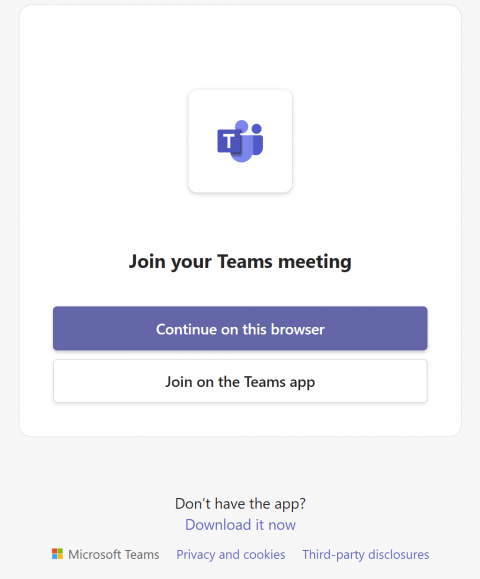
- In the email meeting invitation guests will be able to answer the invitation with a „Yes“, „Maybe“ or „No“ and add a message to the invitee. Then the email will disappear and reappear on the calendar. If someone had not answered the invitation they can click the link in the email "Click here to join the meeting" and otherwise on the calendar:
- A window will appear where you can choose to download the Teams app or use Teams on the web (you might not get both options). If you choose to download the app, you will need to go through normal installing procedure for your operating system:
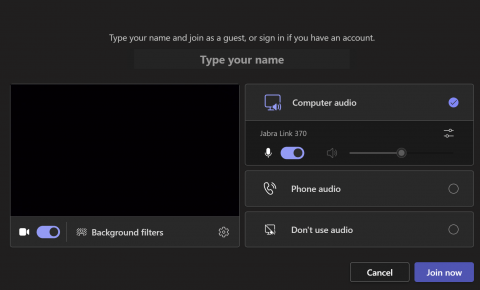
- Meeting guests from outside of the University get a window where they have to put their name and click „Join now“:
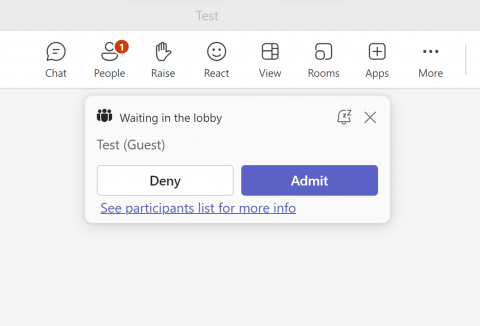
- Meeting organizer gets a notificaton that someone is waiting in the lobby. Click „Admit“ if you want to let them into the meeting:
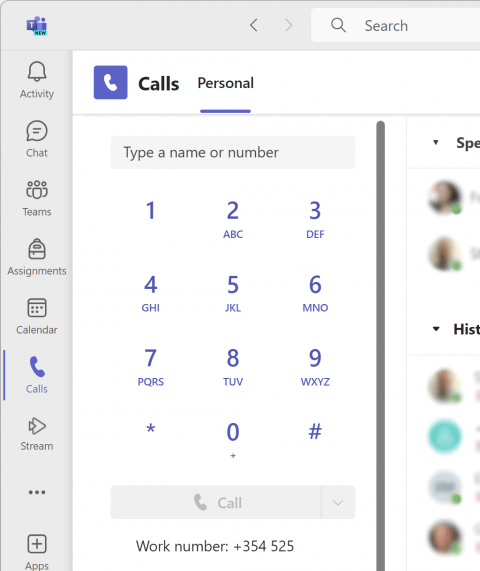
- To place a call in Teams, first select the Calls button. From there you can choose Speed dial, Contacts, History and Voicemail:
- Speed Dial: Add people you call often.
- History: View your call history.
- Contacts: Add contacts button and view contacts you have saved in Microsoft 365.
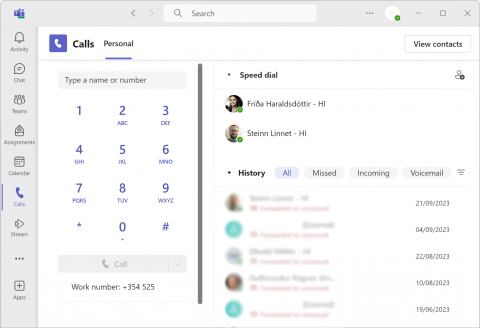
- To place a call, enter the number you want to call and click the Call button. If you are calling within the university, enter the last four digits of the number, e.g. 4222 to call 525-4222. Your number is visible bellow the field where you enter the phone number:
- If your department has set up a Call Queue for a shared phone number then you can join the queue by clicking on the three dots. Select "Settings" → "Calls". Click on the call queue phone number at the top and check the "Recieve calls from this queue"
There are other settings in Settings → Calls that you can change such as ringtone, voicemail and more. It is good to read it carefully if you want to change something.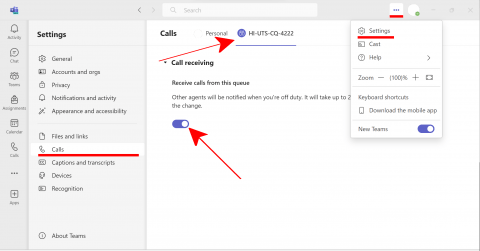
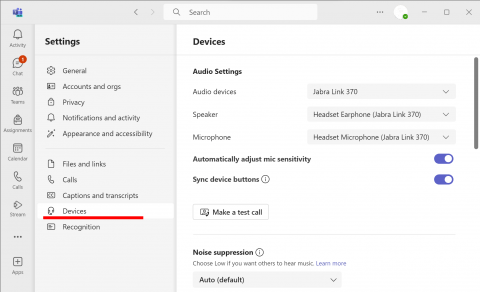
- If you have issues with audio, no one hears you or can’t hear others, check if the correct devices are connected and chosen in Settings → Devices. You can try out your setup by clicking “Make a test call.” If something isn't working right, try switching to a different Speaker device (if you do not hear anyone) or Microphone device (if others can’t hear you).
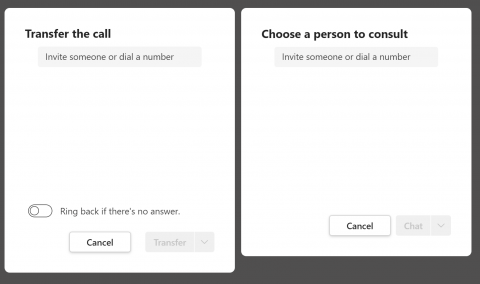
- To transfer a call to another person you select "Transfer". You can also select "Consult then transfer" and the caller will go on hold untill you have finished consulting with the person that you will transfer the call to:

- You can enter a name or a number to transfer the call:
In teams you can forward calls and or setup "Out of Office".
- Heres how to forward calls. Start by clicking on the three dots. Then go to Settings → Calls.
- Forward calls: This allows you to forward every call that you recieve either to another person or to your voicemail.
- When you recieve a call: This allows the call to ring another number simultaneously.
- When you cant answer a call: You can setup a timelimit before the call is redirected to voicemail or to another number.
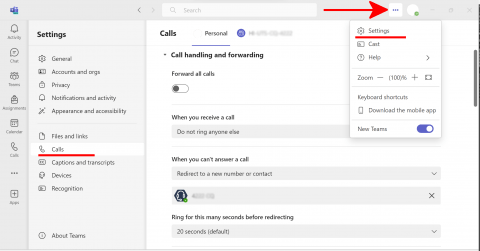
- Heres how to setup "Out of Office". Go to Settings → General. Scroll down and select "Schedule".
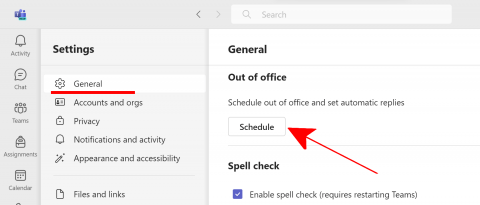
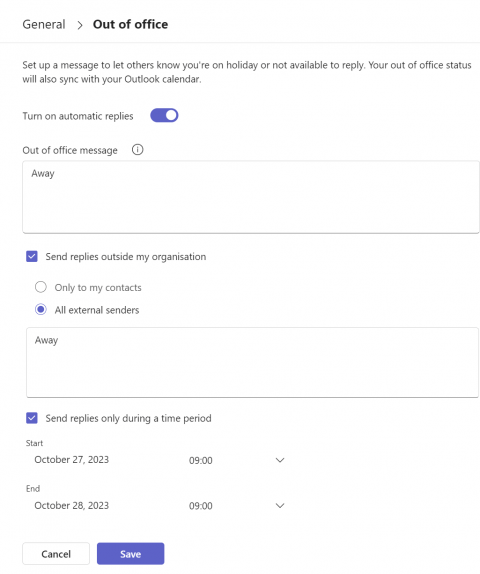
- In this menu you can set up automatic replies with the option to have it active for a certain time period. Once you return remember to turn off this setting if you haven't set up a time period.
Meetings recorded in group channels get automatically saved to the groups files in SharePoint. If they are not recorded in a channel then they are saved in OneDrive (of the person who held the meeting).
- The recordings can be found under Files → Documents → [Channel] → Recordings:

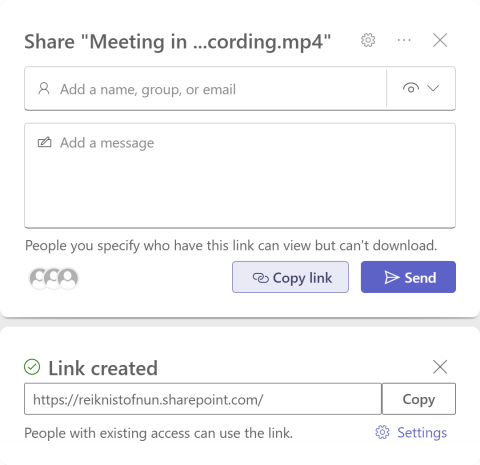
- To share a recording you select the recording and then click on the three dots (or right click on the file) and "Share" it with the recipient or copy the link to the recording. If you want to upload the recording to Canvas then you press "Download":
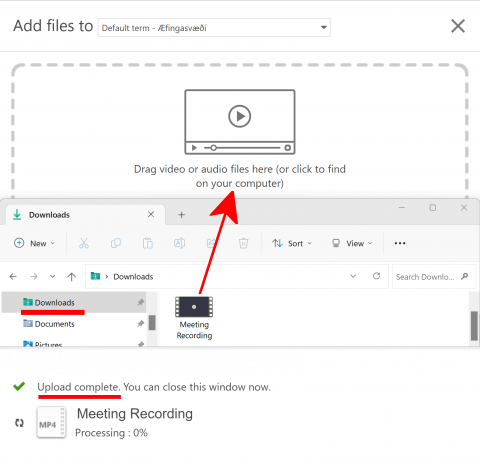
- Once downloaded to the "Downloads" folder you go the the panopto tab in the canvas course and select "+Create" → "Upload media". It is also possible to upload it directly through Panopto but make sure to select the correct course folder.
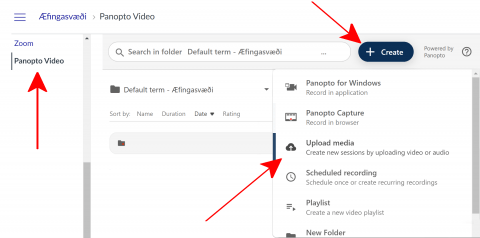
- From there you only need to select the folder and finish uploading it. A status update appears at the bottom of the upload window.
Now it is allot easier for teachers to create Teams meetings for their courses. Teachers can now invite all students, specific groups of students, and even just teachers in each course to an online meeting in only two easy steps.
- Click on the three dots next to a specific course in the course box on Ugla front page. Click there on the Teams icon. You can also go to "My teaching" site in Ugla, and there in the course actions you can also find the Teams icon:

- This opens the form where you decide the title, when the meeting is to take place and who should receive a meeting invitation. Click "Send a meeting invitation" when done:
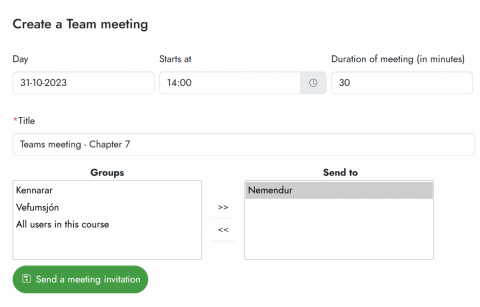
- Those invited to the meeting receive an email with a link to the teleconference. Anyone invited to the meeting can answer whether they will be attending the meeting. They will also see the schedule in their Office calendar with a link to the meeting.
There are multiple ways to access and manage notifications in Teams. Here's how to set notifications in general and how to set notifications from individual channels in teams.
Notifications in general
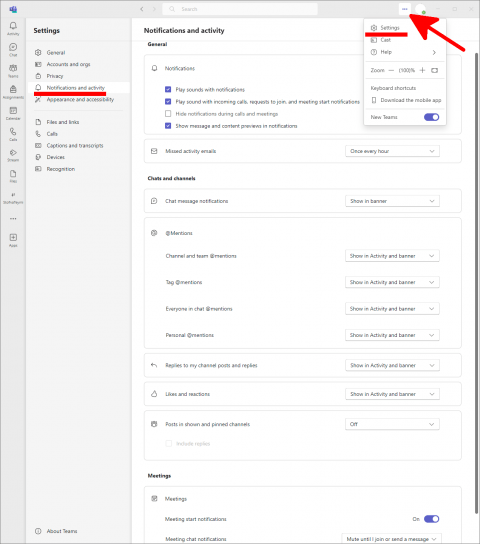
- Click on the three dots in the top right hand corner and choose "Settings":
- Here you can set when and how you get notifications.
- Activity: You will receive a notification in the "Activity" tab located in the top left hand corner in Teams
- Banner: You will be notified with a popup (banner) on your computer.
- Off: You will not get any notification.
- Missed activity email: If you have unseen notifications you can have them sent by email.
Notifications from channels
- Click the three dots next to the channels name for which you want to set notifications and click "Channel notifications":
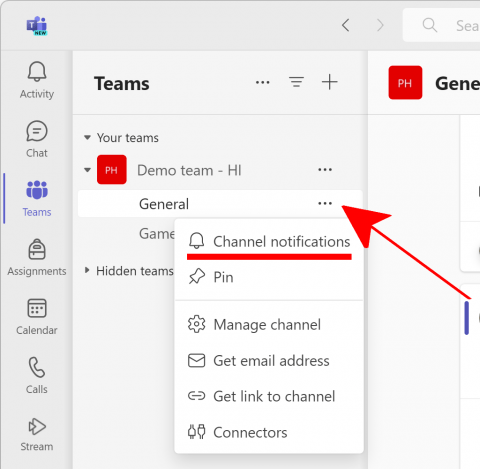
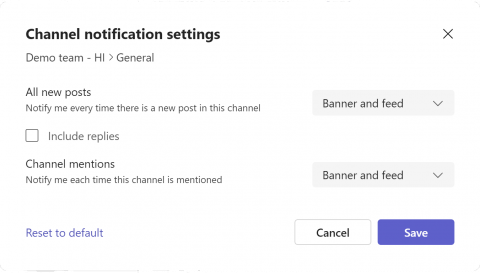
- Choose where and how you would like to receive notifications for the channel.
- All new posts: When someone creates a new post. You can also include all replies.
- Channel mentions: This is when someone tags the channel (fx. @General).
Teams - Groups
Under Teams on the left side menu you will find the teams you are in.
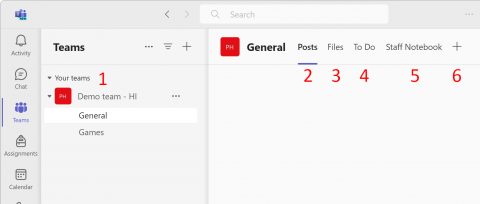
The choices are (see numbers in picture):
- On the left under "Your teams" you find the teams you are in. Under each team is a „General“ channel and additional channels members of the group have added.
- The „Posts“ tab is the message board (chat) of the channel. The chat is built up of threads so each discussion or query gets their own thread.
- Under "Files" you find the files that have been shared in the channel.
- „To do“ has been added to this channel, it connects to planner and keeps track of projects this group is working on.
- In „Staff Notebook“ you can add OneNote to write down notes and more.
- „+“ lets you add more tabs, files and connections to other apps.
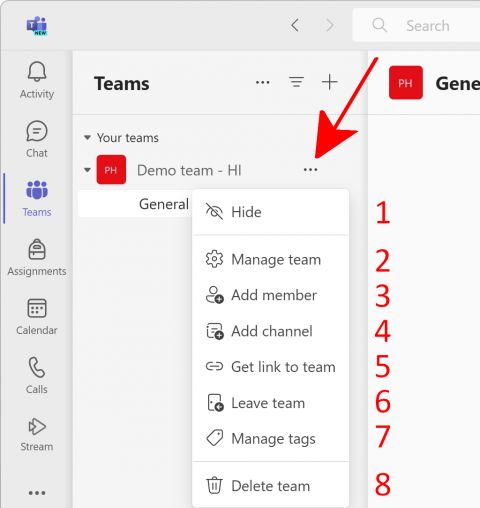
In the three dots next to each team in the team list you find more settings for the team:
- Click "Hide“ if you want to hide the team. You will find it again at the bottom of the group list under "Hidden teams".
- In „Manage team“ you can see a list of members and add more people to the team, see a list of channels and add more channels and apps. If you are the owner of the team you can also see people that are requesting access to the team (Pending requests) and you can change some settings for the team and choose what kind of access members have.
- „Add member“ lets you add more people to the team.
- „Add channel“ lets you add a new channel to the team.
- Choose „Get link to team“ if you need a link to the team.
- Choose „Leave the team“ if you want to leave this team.
- Manage tags allows you to create tags that alert the specific users assigned to the tag.
- If you are owner you can delete the team with „Delete team“.
In the three dots by the name above the team you find more settings:
- Choose whether you want new posts to appear at the top or bottom of the page.
- Click "Channel notifications" to adjust your notification settings for this channel.
- Select "Pin" if you want to pin the channel to the top of your teams overview.
- Under "Manage channel" you can get analytics data for the channel and choose who can post in that specific channel.
- Click „Get email address“ to get the email address of the channel: When you send in an email it will appear as a post on the channel.
- Choose „Get link to channel“ if you need a link to the channel
- Choose "Connectors" to connect apps to the channel.

This is how groups are created in Microsoft Teams. You can create groups elsewhere but we recommend creating them in Teams.
- Open Teams (either the Teams client or in a browser).
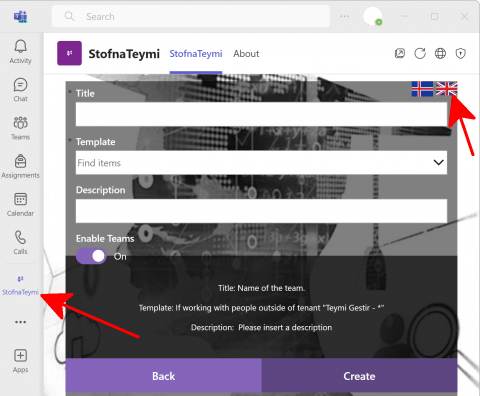
- Click on "StofnaTeymi". Select english and fill out the form:
- Title: Name of the group. Keep in mind to give the group a clear and descriptive name as the name is visible to other people at the University even though they can't access the group.
- Template is the type of group you want
- Teymi Innri -HI is a group that only people within the University can be invited to. This is a safer option if you don't need to invite outside guests.
- Teymi Gestir - HI is a group that anyone can be invited to.
- Description of the group. It should explain what the group is for.
- Keep the "Enable Teams" option on "On" unless you don't want the group to have a Teams group associated with it.
- Click "Create" to finish creating the group. It can take a few minutes to process.
- After creating the group you should see it under Teams along with other Teams groups you are in. It could take a few minutes.
- If external members are going to be added to the group (and the group is set up as "Gestir") then you will need to enter their full email address to add them to the group. Sometimes you may need to add external members through https://myaccount.microsoft.com/groups because of a bug.
Team owners have access to managing the team.
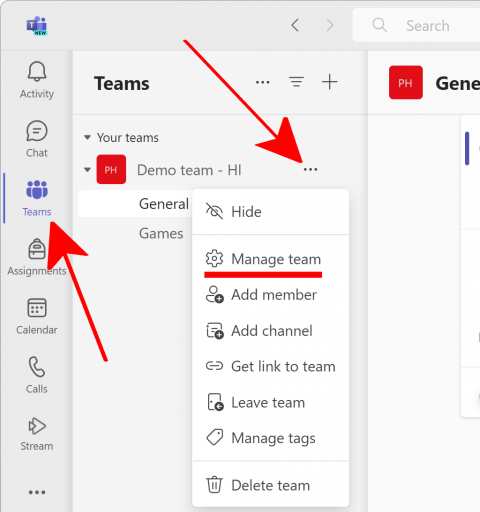
Open Teams and under "Teams"-tab click on the three dots next to the name of the team you want to administrate. Click "Manage team". Below we briefly explain what settings are under each section:
- Members: Here you can see who has access to the team. Change the role of those who have access. Add and delete members.
- Add member by selecting "+Add member".
- Remove members by clicking on the X behind the members.
- Change roles by clicking on the member status
- If external members are going to be added to the group (and the group is set up as "Gestir") then you will need to enter their full email address to add them to the group. Sometimes you may need to add external members through https://myaccount.microsoft.com/groups because of a bug.
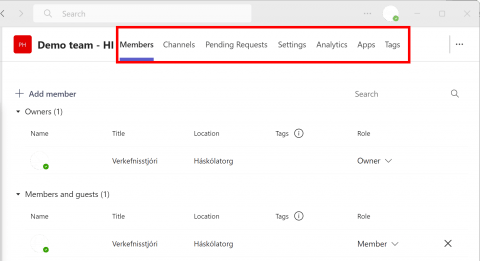
- Pending Requests: Here is a list of those who have applied for access to the team you can accept or deny them access. If you select "Get link to team" you get an invite link you can send to a group of people.
- Channels: Each team has one default channel called "General". Here you can add more channels and configure existing ones.
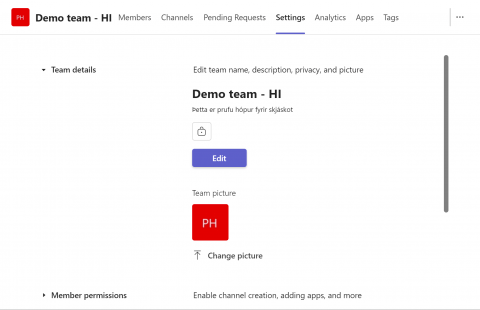
- Settings:
- Team name: Here you can change the team name and description. Click on the text to edit.
- Lock: Under edit you can choose whether only team owners can add members to the team or whether the team is public so everyone within the university can join it.
- Team picture: Here you can add or change the team picture.
- Member permissions: Here you set what role gives which access. for example should a member be able to delete their message?
- Guest permissions: Guests are those who are part of the team but do not have an UI address. Here are some settings for the guests.
- @mentions: You can tag everyone in the team e.g. by writing @team and then message. Then everyone in the team gets notified. Here you will find settings if members should be allowed to do this for the whole team or individual channels.
- Team code: Here you can access a code for the team that can be sent to users and give them direct access to the team. Then you do not have to accept access requests, but they access the team right away when they click on the code. This does not work for guests (non-UI users).
- Fun stuff: Here are the settings on whether to allow GIF images, emoji, meme etc. Usually, all of this is allowed to keep the teams entertained.
- Analytics: Here you will find some user-statistics for the team.
- Apps: Here is an overview of the programs that the team can use. You can add more apps and delete existing ones.
You can view all files of any team that you have access to on your computer. Below are instructions on how to make these documents visible in Windows. You must have OneDrive installed on your system to follow these instructions.
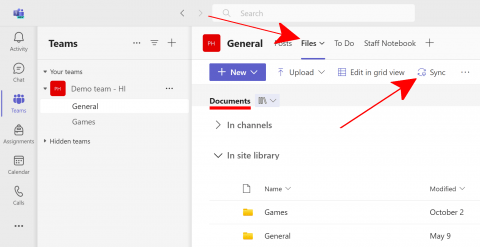
- Select a channel within a team and go to the "Files" tab
- Now select which files you want to Sync. By default the channel you are currently in is selected. Select "Documents>" if you want to sync all channel files.
- Now select "Sync".
- You will find the group files in the "File explorer" on the left menu (Menntaský). On MacOS the folder will appear in your OneDrive folder:

By default you will see all the files but they are not stored on your computer unless you request them. You do this by right-clicking the appropriate group (or folders and documents into that group) and select "Always keep on this device".
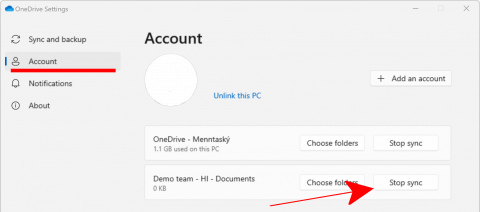
To stop syncing the files you will need to do the following.
- Select the Onedrive icon on the taskbar.
- Click on the gear and open "Settings":
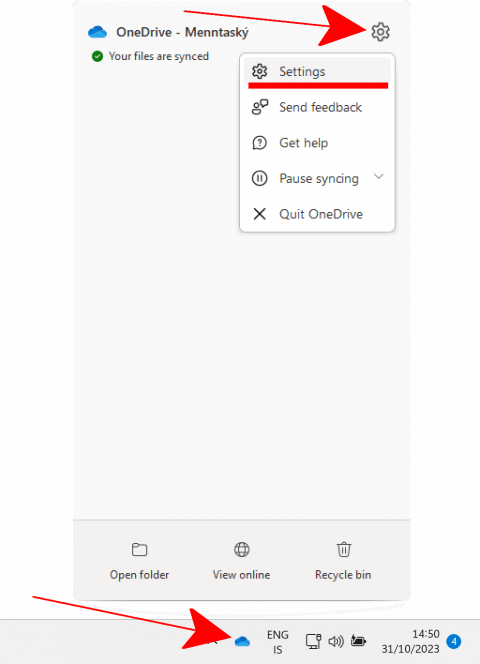
- Select "Stop Sync" and the files will no longer be synced to your computer: