Email in Outlook

Outlook manages email, calendar, contacts and more. Here we focus on email. Outlook is included in the Microsoft 365 (Office) software package.
You can access your email through outlook.hi.is or set up Outlook on your device.
Outlook set up
Outlook is included with the Microsoft 365 (Office) software package. Download it first
- Search for and open Outlook.
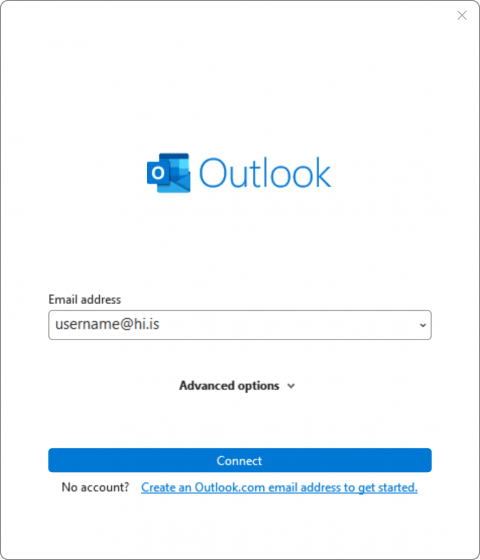
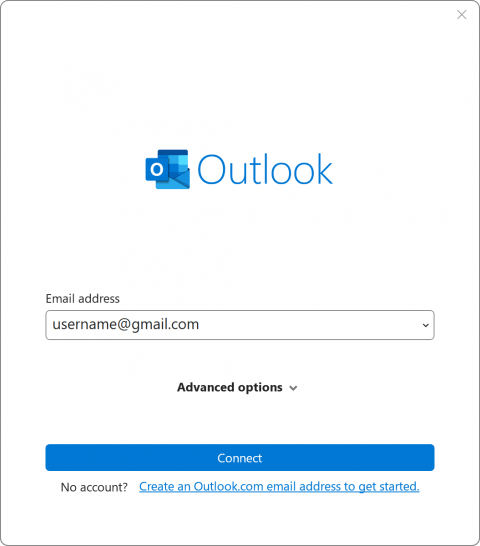
- When opening Outlook for the first time, you will be asked to fill in your UI email address (username@hi.is). Type your address and click "Connect":
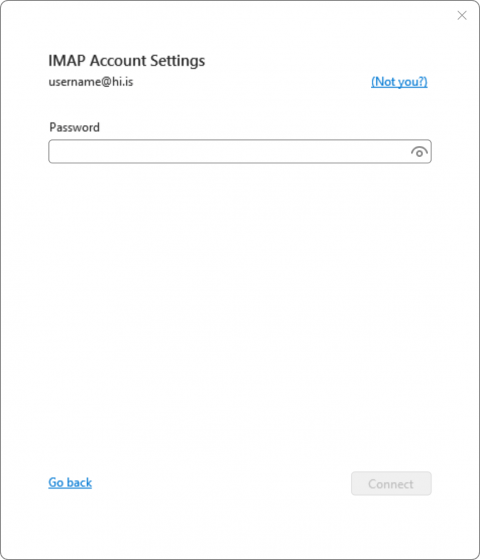
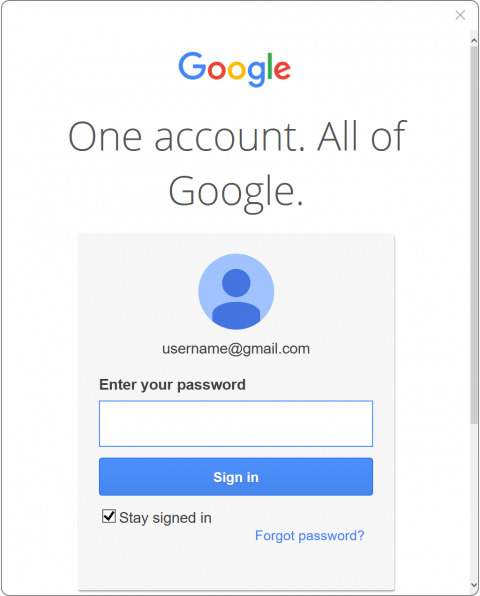
- Enter your password:
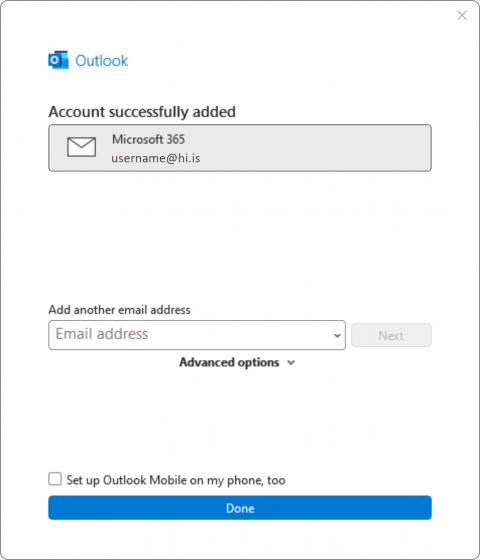
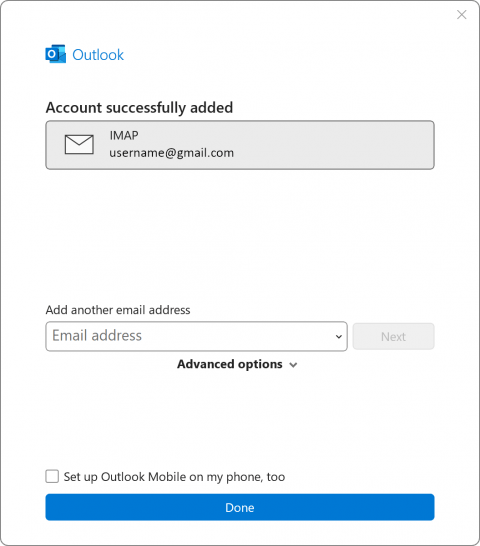
- The "Account successfully added" message appears. It is recommended to untick "Set up Outlook Mobile on my phone too" before clicking "OK":
- Your mailbox should now be set up in Outlook. Mail download may take a few minutes if you have a large mailbox.
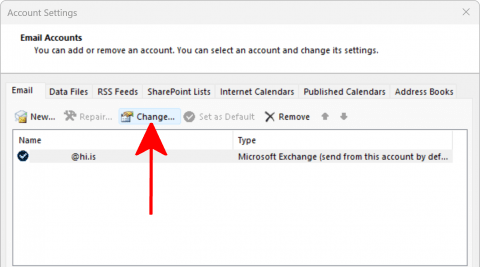
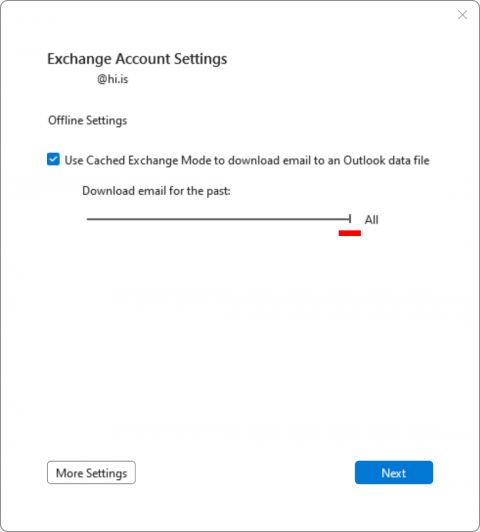
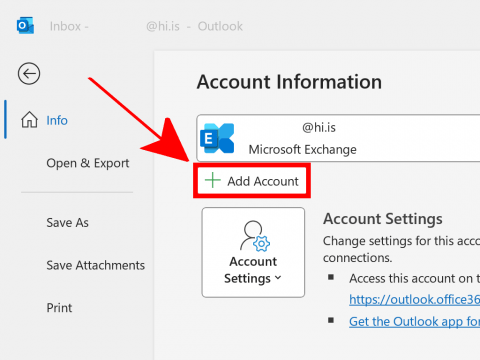
Outlook automatically only downloads the last 12 months of emails to the machine. If you want to receive all your old mail making searching for older mail allot quicker, follow these steps - Click „File“ in the top left corner. Choose „Account settings“ and again „Account settings“:

- Choose the right email address and click on „Change“:
- Move the slider furthest to the right to see all the mail. Then click on „Next“ and finally „Finish“:
- We recommend taking a look at the instructions on this page for various Outlook settings.
The Division of Information Technology (DIT) recommends using Outlook for MacOS.
Begin by installing Microsoft 365 (Office) on your computer, if you have not done so already.
Once Microsoft 365 (Office) has been installed on the computer, go to Applications in the Finder and search for Outlook. Drag the application down to the dock to easily access it later.
If you are opening Outlook for the first time, skip ahead to Step 4.
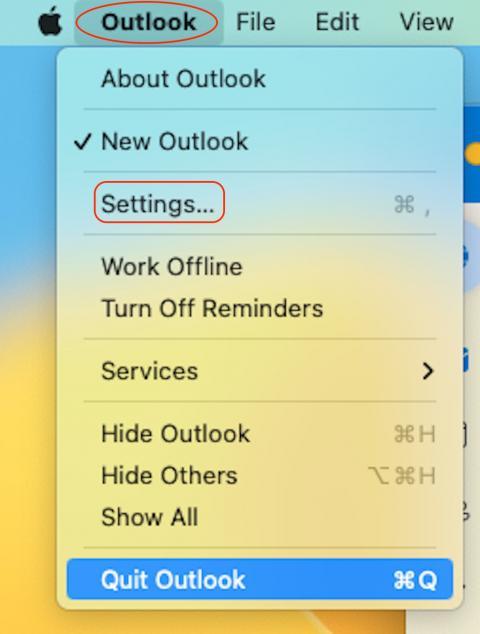
- Open Outlook and go to "Outlook" in the menu bar. Select "Settings":
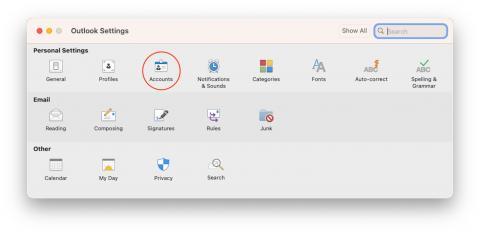
- Click on "Accounts":
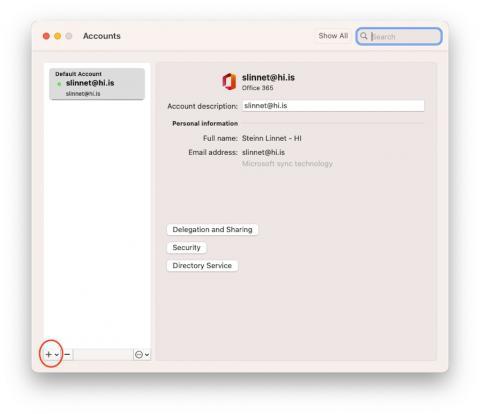
- Click on the plus sign „+“ at the lower left corner and select "Add an Account":
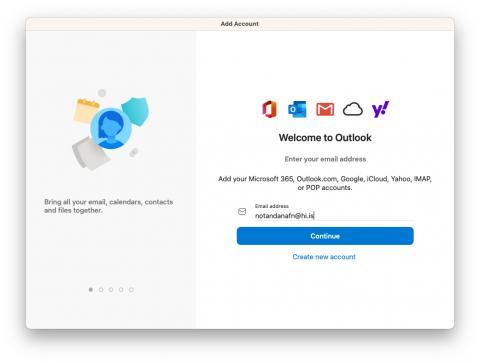
- A window appears in which you enter your UI email address and then password. Select continue:
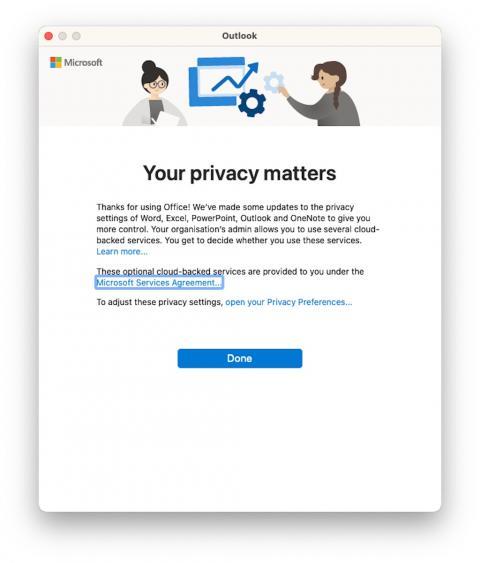
- Outlook will ask you to accept their terms of use:
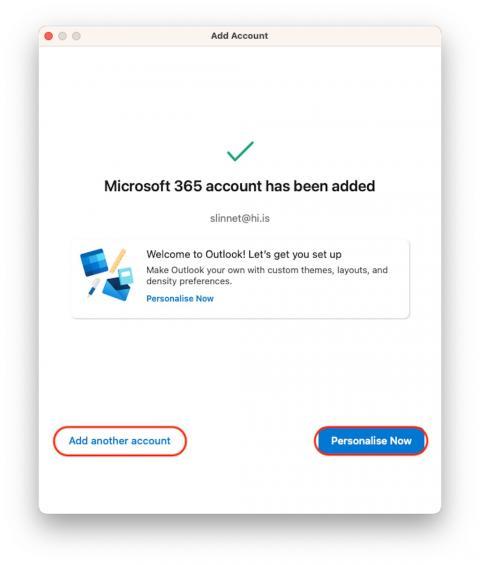
- You have now registered your UI email address. Outlook takes care of setting up your mailbox. If you wish to add additional email addresses, select "Add Another Account". Otherwise, choose "Personalise Now":
- Here you will be given options to personalise the look of Outlook:
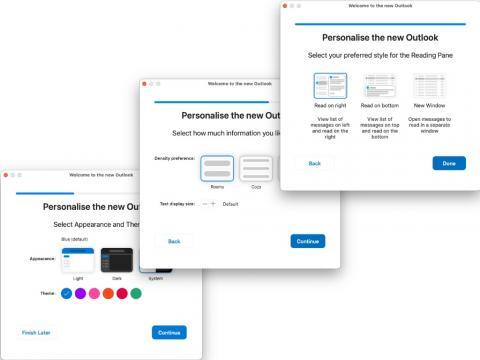
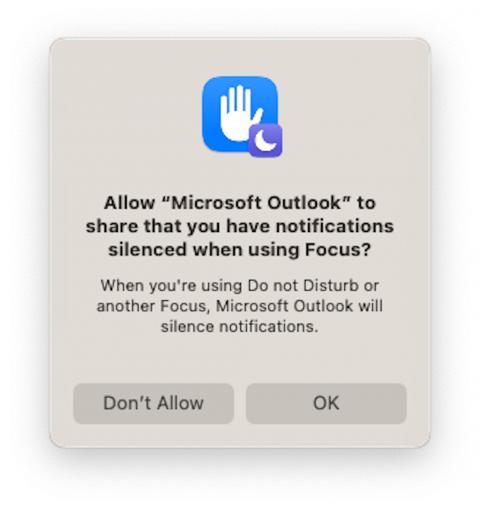
- The last window will ask if you want notifications:
Your mailbox should now be set up in Outlook. Mail download may take a few minutes if you have a large mailbox.
We recommend using Outlook for MacOS. However, many wish to continue using the Mail software. Here are instructions for setting up a UI mailbox in Mail. Accounts are added through System preferences on macOS 12 and older, In Ventura and onward its in System Settings:
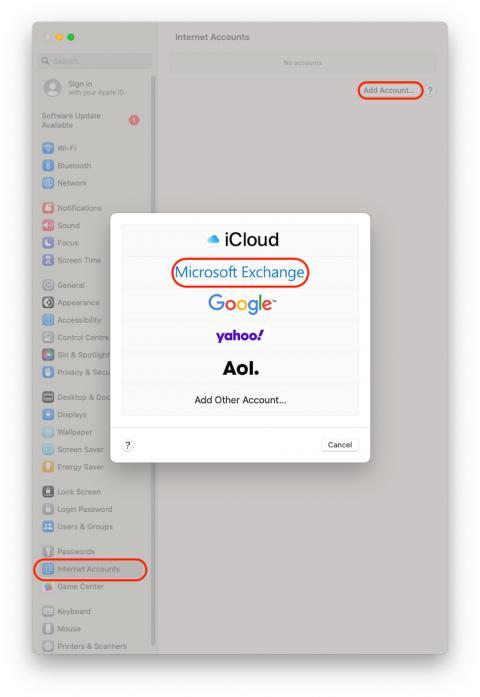
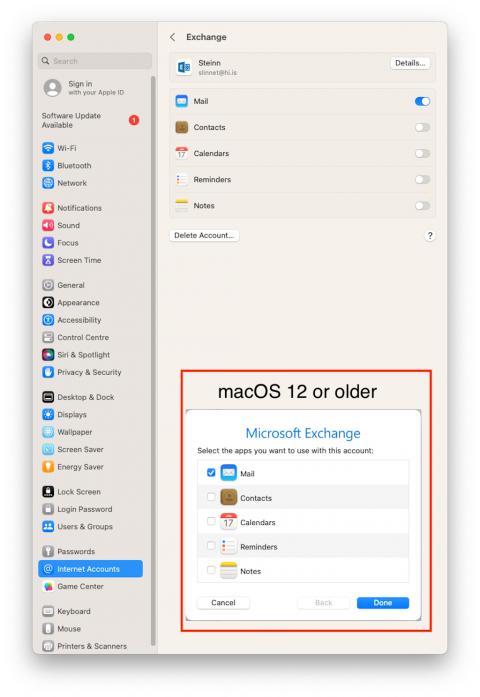
- On macOS 13 Ventura you open "System Settings". Go to "Internet Accounts". Select "Add Account" and make sure you select "Microsoft Exhange":
On macOS 12 and older you open "System Preferences". Go to "Internet Accounts" and make sure you select "Microsoft Exchange":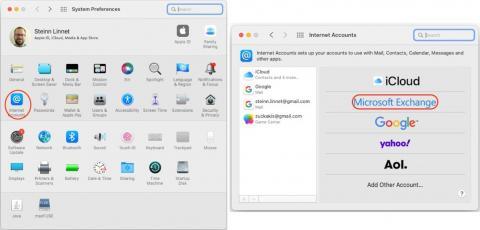
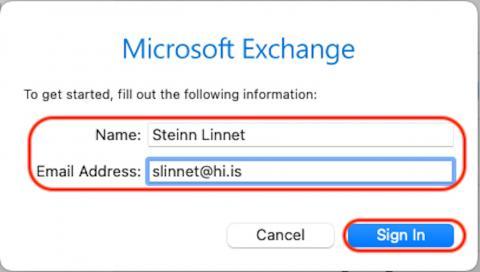
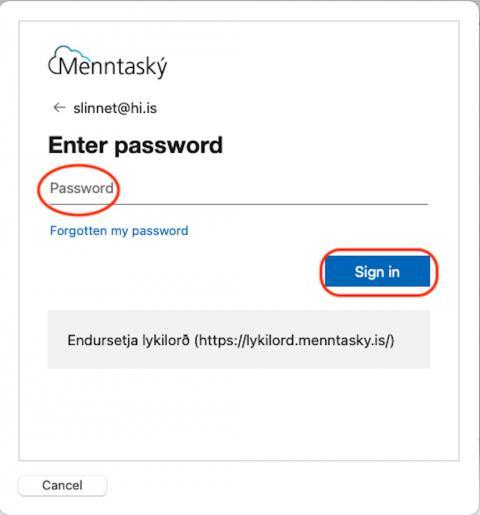
- Give the inbox a name. Enter your UI email address and click "Sign In":
- Now enter your password and sign in:
- Here you can choose what apps can use your email data. We recommend choosing all of them. Click "Done":
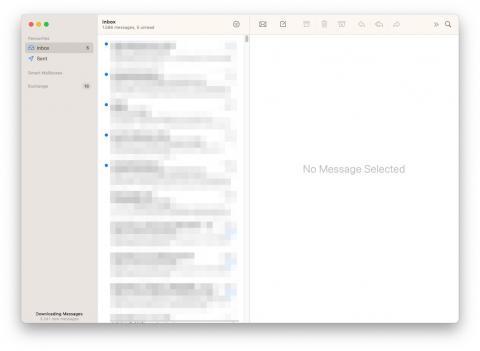
- Now you have created a connection with Outlook and your mail will start to download. You may have to wait a little bit untill its finished downloading.
When this was written MacOS 10.13 and older are no longer supported
- To set up Outlook, download the Outlook app through the Play Store.
- Open the app and sign in with your university email address (username@hi.is).
- Your mailbox is ready. It could take a little bit of time for all the email to load.
Here you can find instructions for setting up your UI mailbox in Outlook for iPhone and iPad.
- Download the Microsoft Outlook through the Appstore. Once finished open the app.
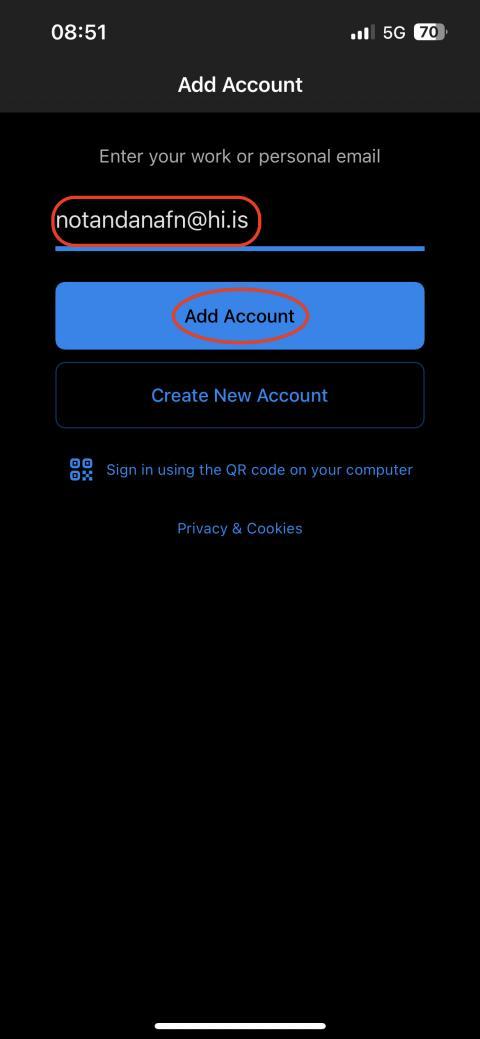
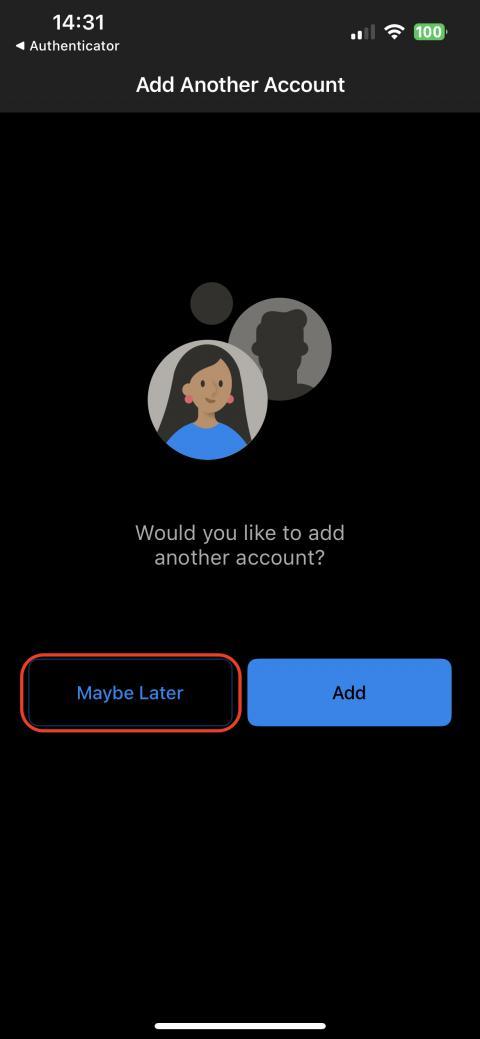
- Sign in with your UI email address. Select "Add Account":
- A window appears, asking if you wish to add any additional email addresses. Here, you may add additional personal or work-related email addresses. Choose "Maybe later" if you do not intend to add additional email addresses at this point. You can always add additional email addresses later:
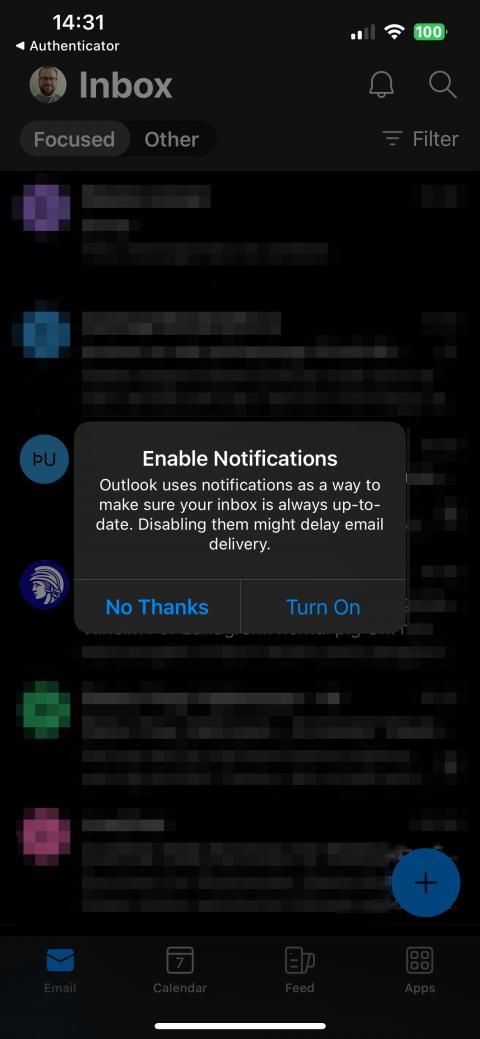
- Your mailbox is now set up and you can start using your UI mailbox. Outlook will ask if you want to recieve notifications: It could take a little bit of time for all the email to load.:
Here are instructions on how to add your university email to Maill on iPhone og iPad.
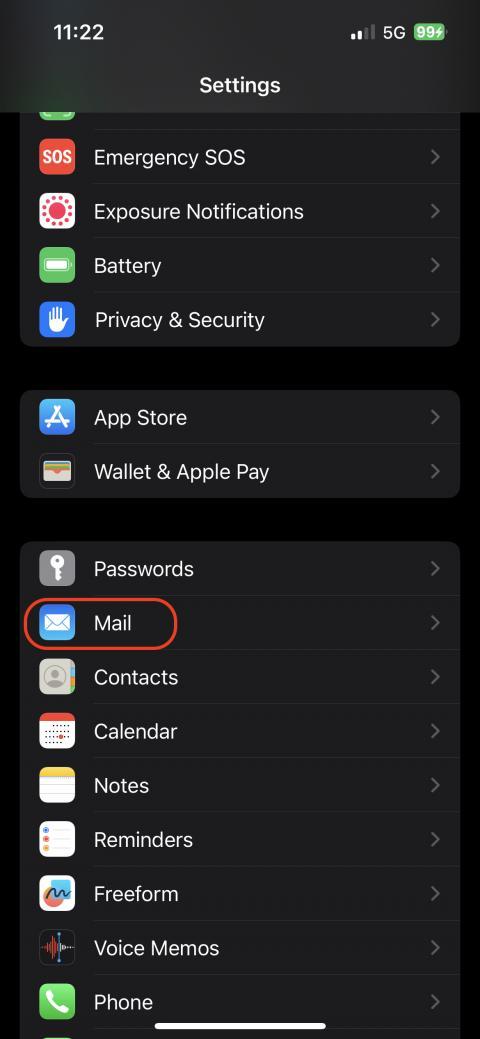
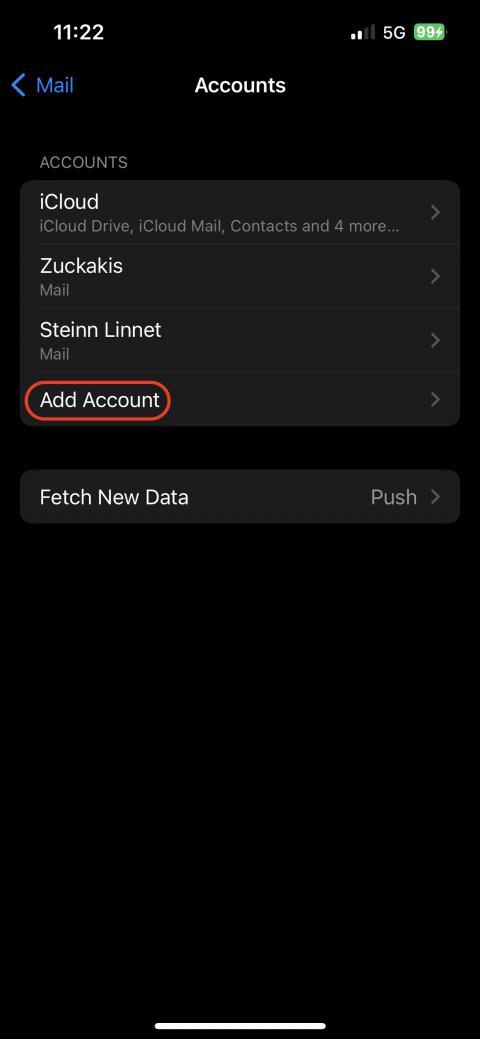
- Start by going to "Settings" and selecting "Mail"
- Select "Accounts":
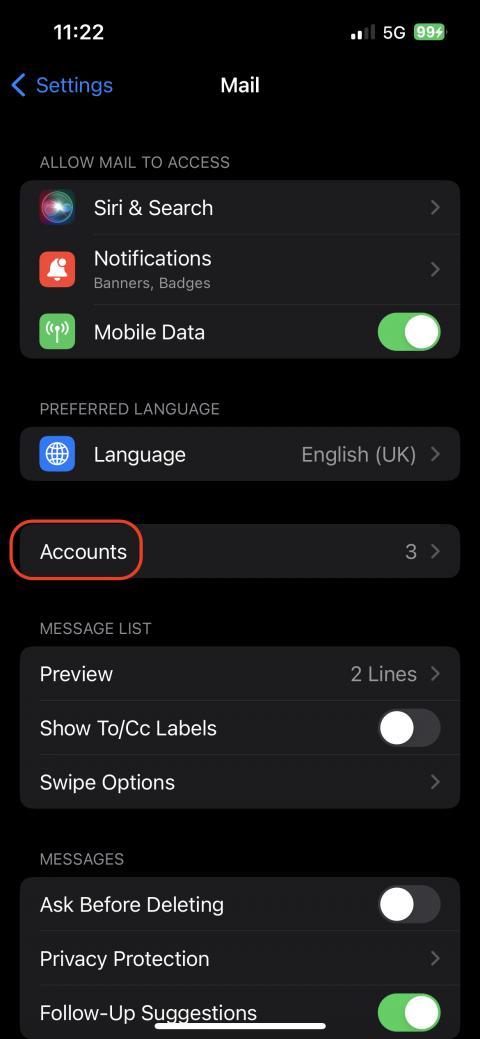
- Select "Add Account":
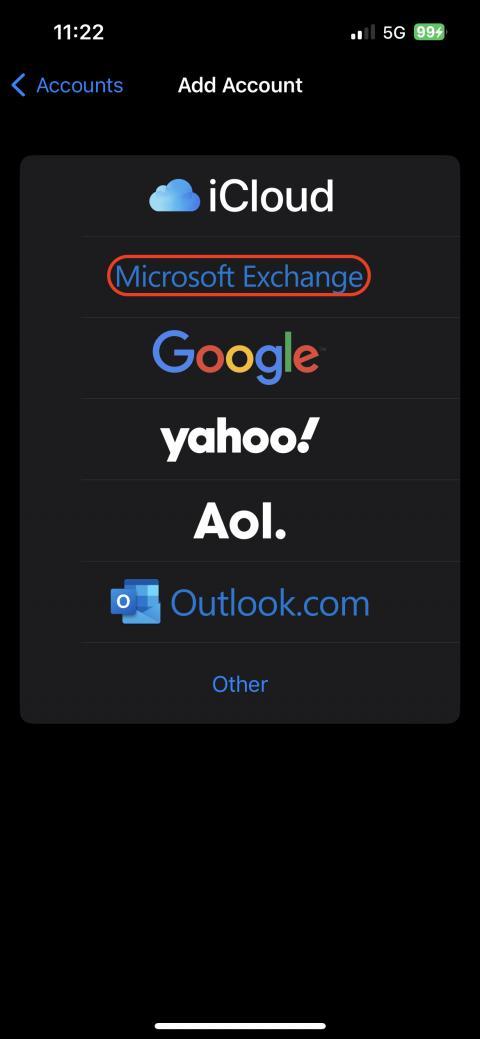
- Select "Exchange":
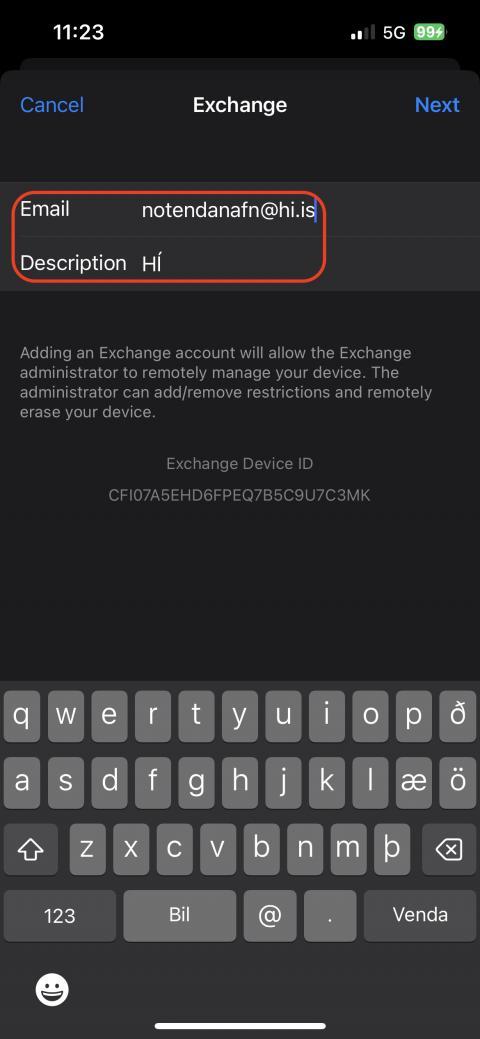
- Enter your university email address and give it a name. Then you select "Sign In" and finish signing in:
- Here you can select which email data to synchronize with the inbuilt apps. We reccomend you only select Mail. Other features do not work with iOS and have caused the Mail to stop fetching new emails. Select "Save" and your done
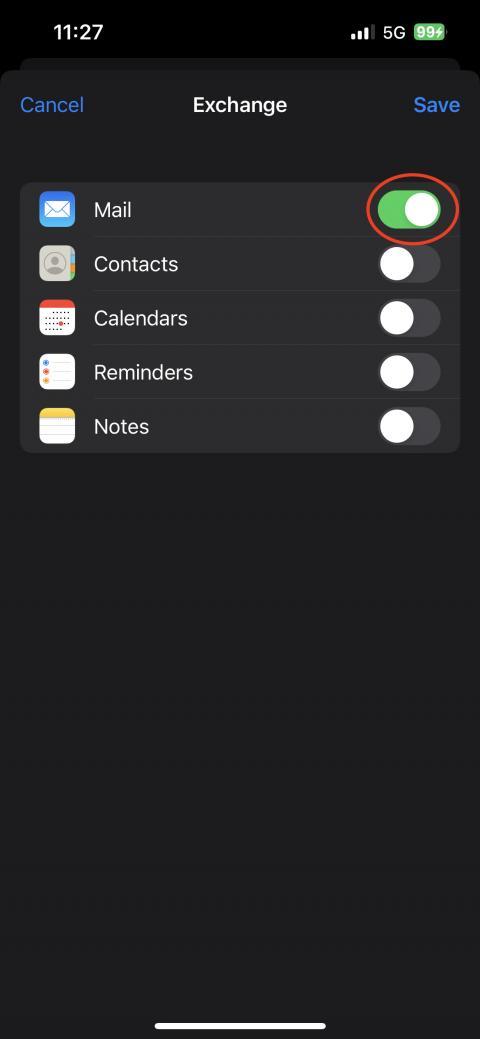
Now you can open Mail and see your mail, calendar and more.
Outlook is not available for Linux. We therefore recommend that Linux users utilise the Outlook on the web through outlook.hi.is.
Alternatively Linux users can install a mail program which supports Microsoft Exchange such as Evolution. This software program works very well with Outlook and an advantage is that the calendar automatically synchronises with the web-based calendar. Linux users can install this program should they choose not to use the online the online version of Outlook.
It is also possible to use IMAP settings, the downside being that this will not give users access to the calendar, contacts, and other tools.
Below are instructions for setting up Evolution in Linux:
- Open the Terminal and run Evolution through the package manager of the respective Linux distribution
- In Ubuntu type: sudo apt install evolution evolution-ews
- In Arch type: sudo pacman -S evolution evolution-ews
- 2) Open Evolution and click "Next":
- 3) Click "Next":
- 4) Type your full name and email address. Untick "Look up mail server details" and click "Next":
- 5) Fill in the following information and click "Next":
- Server Type: Exchange web servies
- Username: username@hi.is
- Host URL: https://outlook.office365.com/EWS/Exchange.asmx
- Tick "Listen for server change notification". It is also a good idea to increase the frequency of checking for new messages and checking for messages in all folders. Click "Next":
- Here, you can give your mailbox a name. In our example, we use "Háskólapóstur" (University mailbox), but you can choose anything which you consider describes the mailbox best.
- Click "Apply":
- If the mailbox does not appear, it may be necessary to restart your device.
NOTE that software programmes which use IMAP settings can only access email. IMAP does not allow access the calendar, contacts, tasks, and other features.
We, therefore, always recommend that users utilise the Outlook software, since it contains many features connected to the entire Microsoft 365 software programme all in one place, such as access to the calendar and contacts, creating groups, sharing files, booking meeting rooms, and more. Some users, however, prefer to set up their mail using IMAP settings. Here is the necessary technical information for these users:
Always select IMAP - We strongly discourage users from using POP protocols.
- Incoming
- IMAP
- Server hostname: outlook.office365.com
- Port: 993
- SSL: SSL/TLS
- Authentication: Normal password
- Outgoing
- SMTP
- Server hostname: smtp.office365.com
- Port: 587
- SSL: STARTTLS
- Authentication: Normal password
- Username
- Incoming: your email address (including the @hi.is extension)
- Outgoing: your email address (including the @hi.is extension)
Thunderbird does not support Microsoft Exchange. It is, therefore, necessary to configure Thunderbird using IMAP settings. IMAP only allows access to your email. You cannot access the calendar, contacts, or tasks.
We, therefore, always recommend that users utilize the Outlook software, since it contains many features connected to Office 365 all in one place, such as access to the calendar and contacts, creating groups, sharing files, booking meeting rooms, and more. However, many choose to use different software. Here you can find instructions for setting up your UI mailbox in Thunderbird.
Click "Re-test" once you have filled everything out:
- Open Thunderbird. It should prompt you to set up an account. Input your name, email address and password and click "Continue":
- Click "Configure manually":
- You need to change the outgoing/incoming server and it is important that you set it up correctly.
- Incoming server
- Protocol: IMAP
- Hostname: outlook.office365.com
- Port: 993
- Connection security: SSL/TLS
- Authentication: OAuth2
- Username: your email
- Outgoing server
- Hostname: outlook.office365.com
- Port: 587
- SSL: STARTTLS
- Authentication: OAuth2
- Username: your email.
- Incoming server
- Click "Re-test" once you have filled everything out:
- Click "Done":
- Input your password and click "Sign in":
- Click "Accept" to allow Thunderbird access to your email:
- Your mailbox should now be ready. Click "Finish":
The mailbox should now be set up and your UI email should appear after a few seconds. Please note that it may take a few minutes for all folders and emails to show up if you have a large mailbox.
Email instructions
Informations for employees
According to the Privacy Protection's Work Rules on the handling of e-mails and internet use, employees are not allowed to forward e-mails.
Instructions for students
It is very important to have an activated UI email address. However, not everyone wants to keep track of multiple email addresses and/or log into their UI mailbox each day. It is possible to forward all emails received by your UI email address to a different address, such as Gmail.
The easiest way to do this, is in the browser, and we recommend you set everything up there even if you generally use Outlook on your computer or phone. This is how you set up email forwarding:
- Open your browser and go to outlook.hi.is
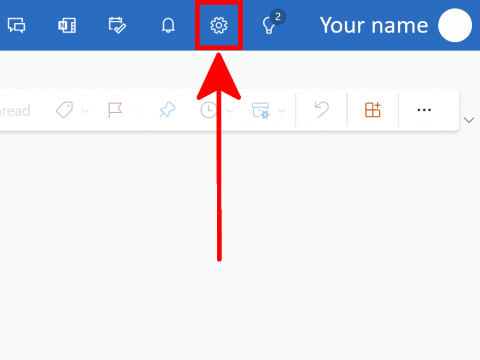
- Click on the gear wheel in the top right corner:
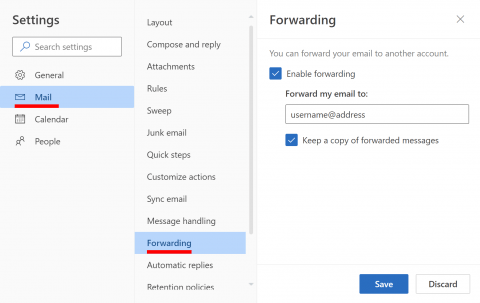
- Select "Email" and then "Forwarding". Tick the box next to "Enable forwarding" and type the email address you wish to forward the mail to. If you want to keep a copy in your UI mailbox, tick the box next to "Keep a copy of forwarded messages". Click "Save" at the bottom:
Outlook allows users to save text passages, which then can easily be used later on. This could be, for example, answers to frequently asked questions. You can compose a great answer, save it, and use it later when the same question comes up again. That way, you avoid having to type the same reply over and over again. Below are instructions for creating such a text passage and using it at a later point.
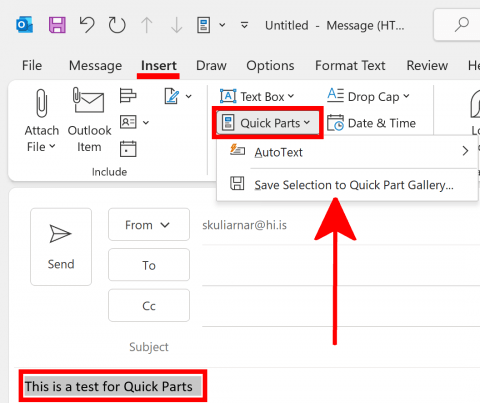
- Begin by creating a new message by clicking "New Email".
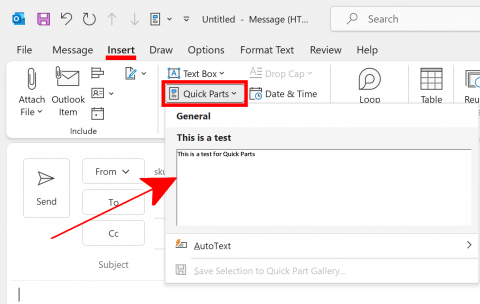
- Type the text you want to save and highlight it. Click the "Insert" tab, followed by the "Quick Parts" button. Here, you would see text you have saved previously. In this case, however, you want to add text to be saved. To do so, click "Save selection to Quick Part Gallery...":
- Give the highlighted text an appropriate descriptive name to make it easier to select it later on. You have the option of creating categories of replies, to keep things more organised if you have many text passages you wish to save. If you want to create categories, click "Category". However, you may skip this step and go straight to Step 5.
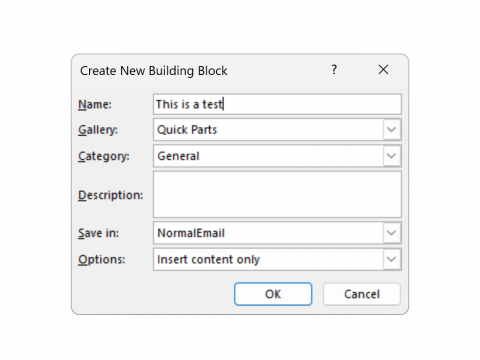
- Give the category a name and click "OK":
- Type a description (optional), which will appear if you hover the cursor over the text block in Step 6, and click "OK":
- Next time you send an email (or a meeting request or event), click the "Insert" tab, followed by the "Quick Parts" icon. A list appears with your saved text passages. Select the one you wish to use. The text will be inserted where the cursor is situated in the email window. An even easier method, which does not require you to click the "Insert" tab each time is described in the following two steps (7 and 8):
- To simplify access to "Quick Parts", click "Insert". Next, right-click "Quick Parts" and select "Add to Quick Access Toolbar":
- Next time you write an email, event, or meeting request, simply click on the small "Quick Parts" icon and select the text passage, no matter in which tab you currently are. Quick and easy:
If you have fallen victim to a phishing scam or accidentally given out your email password, it is a good idea to check if you have unwanted email rules set up in your mailbox.
Even after changing your password and recovering your account, you might discover that the hacker has created an email rule that deletes or forwards all incoming email.
The instructions below explain where to find mail rules and how to delete them. This can only be done in Outlook online because email clients do not have full access to the mailbox settings.
- Open a browser and go to outlook.hi.is. Sign in if you are not already signed in
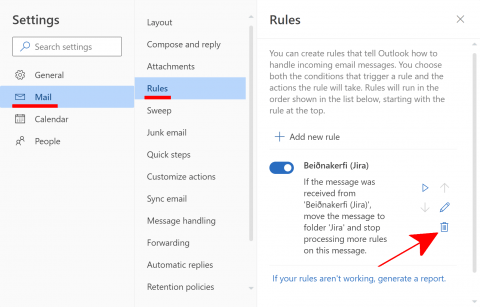
- Click on the settings icon in the upper right corner of the page:
- Navigate to "Mail" and "Rules." There you can view all email rules that have been set up in your mailbox. If you see a mail rule you don't want, click on the trashcan icon to delete it:
- Press "OK" to confirm.
The rule should now have been deleted and will no longer affect your mailbox. Note that this change is not retroactive and does not affect emails that the rule may have dealt with already, emails that were moved to the Deleted items folder will not automatically be moved to the Inbox.
It is possible to choose the delivery time at which the email will be sent.
It is important that the computer and Outlook are both running at the delivery time.
- Start by creating a new email by clicking on "New email".
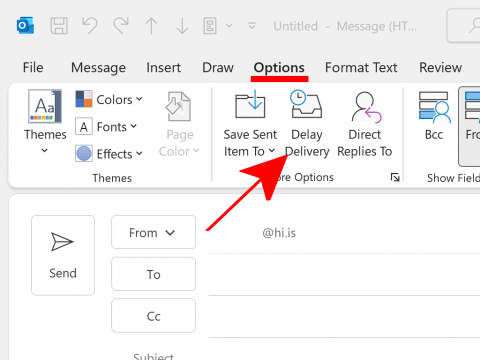
- Click on the options tab and then click on "Delay delivery":
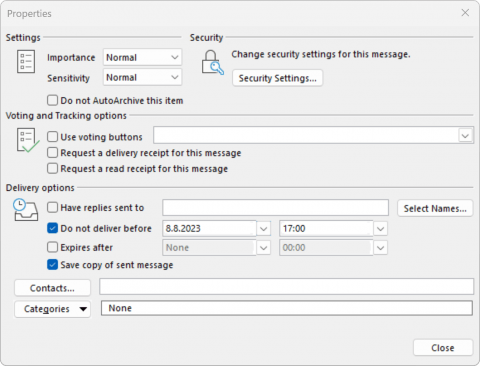
- Check "Do not deliver before". Enter the time and date at which to send the email and then click on close:
- The "Delay delivery" button should now be higlighted. Click on send once you have finished writing the email. The email will be sent at the time you selected as long as your computer is turned on and Outlook is open (and connected to the internet).
- To add another mailbox to Outlook click "File" and "+ Add account":
- Write your email in the field and click "Connect":
- Write your password for the mailbox and click "Sign in":
- Click "Done" and the mailbox should be set up, you might need to restart Outlook to see the mailbox:
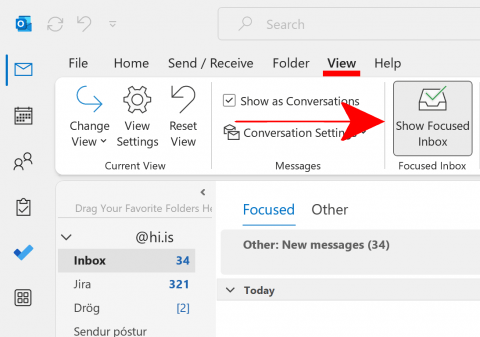
This is how you activate Focused Inbox in Outlook.
Outlook on Windows:
- Click "View" and then "Show Focused Inbox":
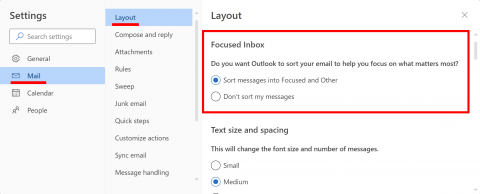
Outlook through a browser:
- Go to outlook.hi.is. Click on the settings icon in the top right hand corner:
- Navigate to "email" and layout. Select "Sort messages into focused and other":
Sorting mail into folders using rules
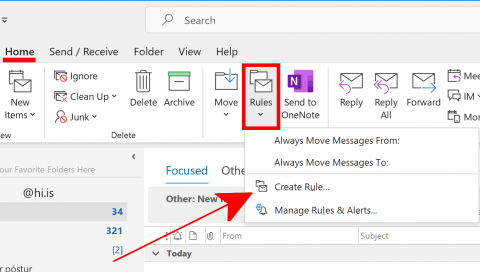
Outlook allows you to create various rules and filters. In our example, we show you how to sort emails from a specific contact in individual folders in Windows. However, it is possible to sort email by various other means, e.g. by subject.
- Select the email for which you want to create a rule. Click on "Rules" under the "Home" tab and select "Create Rule...":
- In the top section, you specify the conditions under which the rule shall apply. In our example, we tick the box next to "From [sender]". In the lower section, you decide what should be done with emails fulfilling the conditions determined above. In our example, we want emails from this sender to automatically be moved to a specific folder. Tick "Move the item to folder:"; then click "Select Folder..." to select the folder to which emails shall automatically be moved each time the defined rule applies.
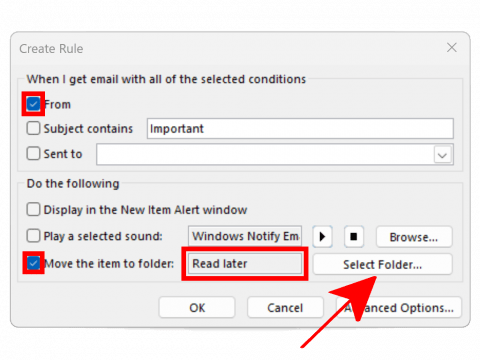
- Select the folder to which emails shall be moved. If you have not yet created a folder for this purpose, click "New..." and create it. Click "OK" once you are done:
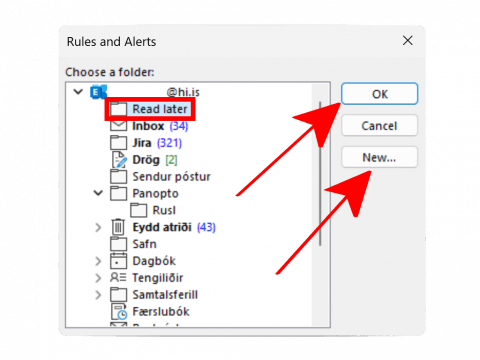
- You return to the previous window. Click "OK" if the rule is correct:
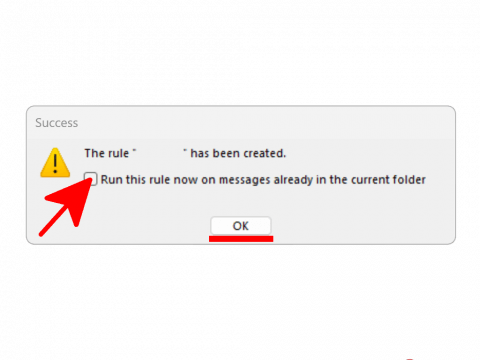
- By ticking "Run this rule now on messages already in the current folder" the rule will apply to previously received emails as well. In this case, all older emails from the specified email address will be moved to the created folder:
-
All emails from the email address for which you created the rule should now automatically appear in the correct folder.
Outlook allows you to create various rules and filters. In our example, we show you how to sort emails from a specific contact in individual folders in MacOS. However, it is possible to sort email by various other means, e.g. by subject.
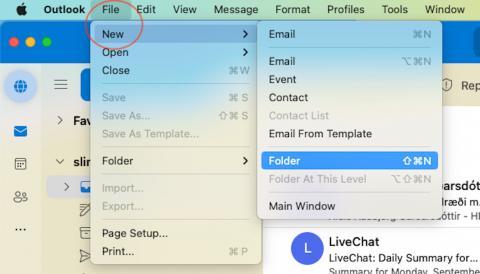
- Begin by creating a folder into which the mail shall be sorted automatically. To create a folder, go to "File" → "New" and select "Folder":
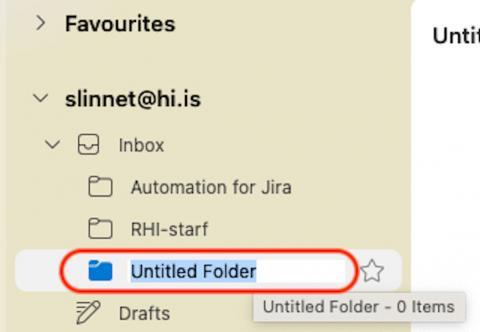
- The new folder appears below your inbox. Click it once to be able to name it:
- Find an email from the sender or with the subject you wish to sort into the folder. Select "Rules" > "Create Rule...":
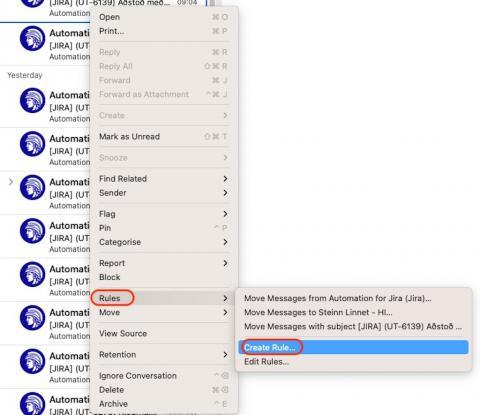
- Here, you can adjust the settings for your rule depending on your needs. If you want to move all email from the specific sender into the folder, click the minus sign (-) next to all unnecessary conditions. If you wish to add conditions, click the plus sign (+). In the sample image, the rule specifies that all emails from "Automation from Jira" are automatically moved to the "Automation for Jira" folder:
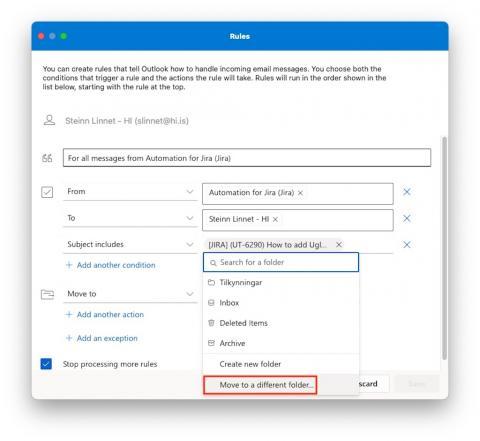
Next you select the folder where the mail will be stored. In this example it's "Automation for Jira":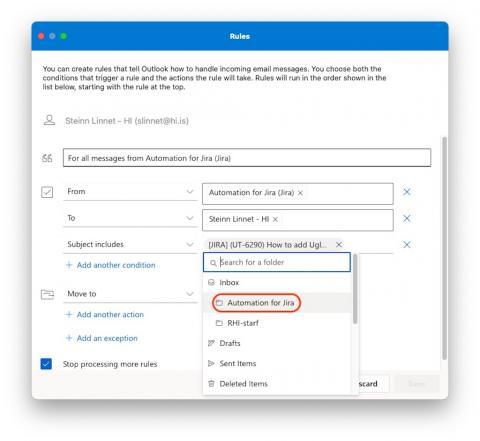
- In this example, we show you how to sort all emails containing the word "JIRA] (UT-6290) How to add Ugl..." in the subject line into the "Automation for Jira" folder. Select the plus sign (+); then select "Subject" in the dropdown menu on the left. Type the word and click "OK":
- Click on "Save" to save and activate the rule
The rule is now enabled and emails fulfilling the specified conditions should automatically be sorted into the folder for which you created the applicable rule.
Outlook allows you to create various rules and filters. Here, we show you how to sort emails from a specific contact in a specific folder in the browser.
- Open your browser and go to outlook.hi.is. Click on the gear wheel in the right corner:
- Click on "Mail" and "Rules"
Here, a list of currently enabled rules is displayed. Click the plus sign to create a new rule: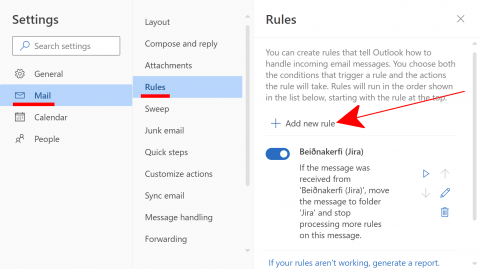
- Before continuing, read the explanations for the fields you should fill in:
- Name: Give your rule a name. It is advisable to choose a name that describes the rule well.
- When the message arrives, and it matches all of these conditions: When the message arrives, and it matches all of these conditions:
- Do all the following: Select "Move the message to folder...". A window opens. Here, you select the folder to which you wish to move emails that fulfil the conditions of the specified rule.
- Stop processing more rules: It is a good idea to always tick this box if you are dealing with a basic rule, e.g. if you created a rule that all emails from jonjon@hi.is shall be sorted into a specific folder.
Click "OK". The rule now appears in the list of enabled rules:
Out of office setting
If you are out of the office for a longer or shorter period of time, it is a good idea to enable the Out of Office rule in Outlook. These instructions show you how to do this in Windows.
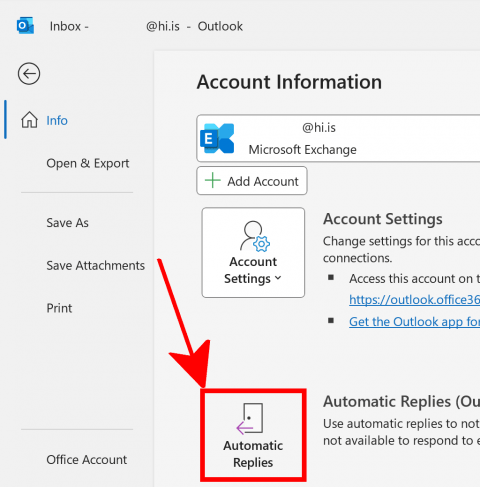
- To enable the Out of Office rule, go to "File" and click on "Automatic Replies":
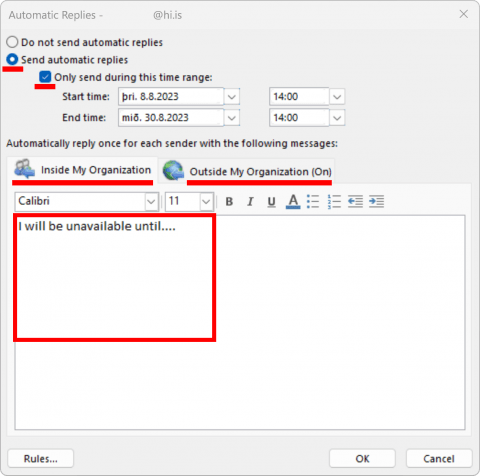
- Select "Send automatic replies". If you want to enable the rule for a specific time period, tick "Only send during this time range" and select a "Start time" and "End time". Next, type the text you wish to appear in the automated email; in the "Inside My Organization" field for UI email addresses, and in the "Outside My Organization" field for external recipients. Click "OK":
If you wish to disable the rule before the selected end date or if you did not restrict the rule to a specific time period, go to "File" and click "Turn off":
If you are out of the office for a longer or shorter period of time, it is a good idea to enable the Out of Office rule in Outlook. These instructions show you how to do this in MacOS.
- To enable the Out of Office rule, select the "Tools" tab, followed by "Out of Office":

- Tick the box next to "Send automatic replies for account...". Type the email text you wish to include in your automated reply into the field below "Reply once to each sender with:". Note that only UI email addresses will receive this automated reply. If you want an email to be sent to all senders, type an automated reply text in the field below "Reply once to each external sender with:", tick the box next to "Also send replies to senders outside my organization", and select "Send to all external senders". It is a good idea to specify a start end end time, since the rule will then automatically disable once you return. To do so, tick the box next to "Only send replies during this time period" and select a start and end time. Click "OK" when you are done:

If you are out of the office for a longer or shorter period of time, it is a good idea to enable the Automatic replies (Out of Office) rule in Outlook. These instructions show you how to do this in webmail (browser).
- Go to outlook.hi.is and log in. Click on the settings icon in the top right corner:
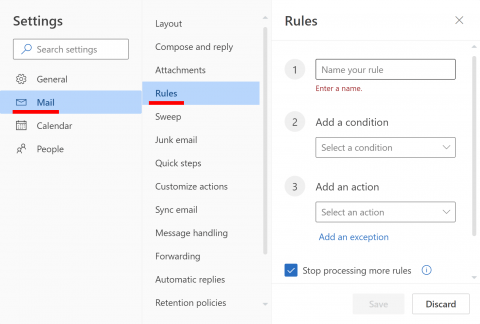
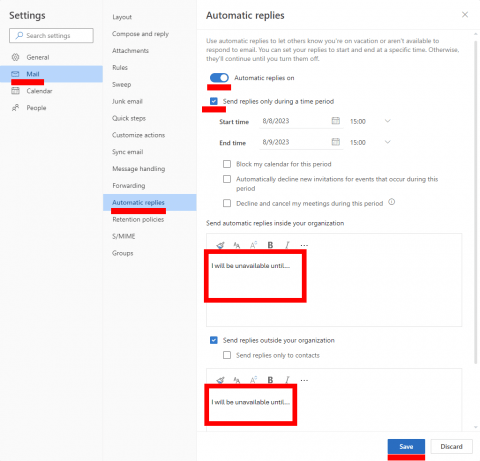
- Select "Email" on the far left and then "Automatic replies". Turn on auto-replies by clicking "Automatic replies on" (NOTE that auto-replies will not enable until you click "Save" at the bottom). If you want the Automatic reply to be sent out only during a specified time period, check "Send replies only during a time period" and then select the correct dates and time. Next, put the message you want in the mail. It is a good practice to type in Icelandic and English texts both for "inside your organisation" and "outside your organisation". Then click "Save" at the bottom when you have filled out the form the way you want it:
Signature
Here you find instructions for creating an email signature in Outlook for Windows 10. You will find a video at the bottom of the page.
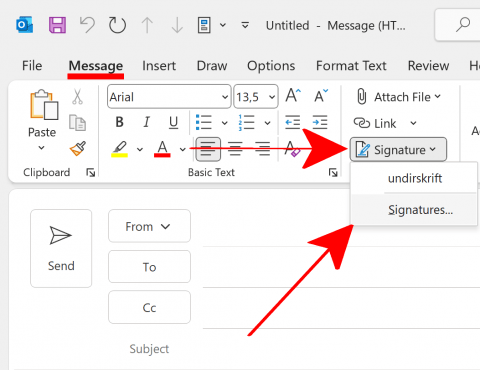
- To create and attach a signature in Outlook create a "New Email":
- Next, click "Signature" and select "Signatures...."
- Click "New":
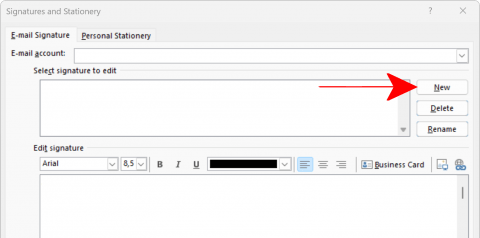
- Give the signature a descriptive name and click "OK":

- If you have more than one email account, select the email account for which the signature shall apply under "E-mail account". It is also necessary to choose if the signature appears in all "New messages" and/or "replies and forwards". It is possible to have different signatures for different occasions. It can be good to have a simplified signature for "Replies/forwards:".
If "(none)" is selected in both fields, the signature will not automatically appear in the email. However, you can easily add it manually via the "Signature" button.
Type your signature into the large box. You can adjust the font and size to your liking. Click the image icon if you wish to add an image. Employees make sure you follow the standards stipulated by UI. Signature standards for UI staff can be found at the link. All you need to do is copy the standard and change your name, title, and so forth: UI design standard - signatures: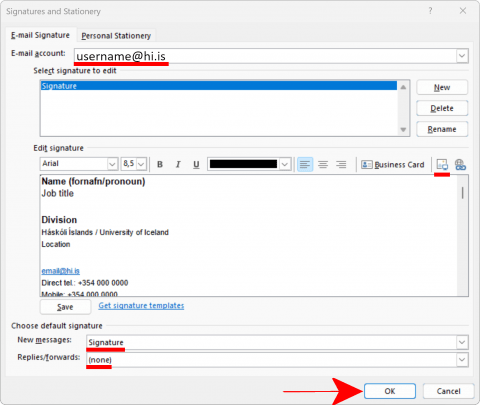
- Click "OK" once the signature is finished:
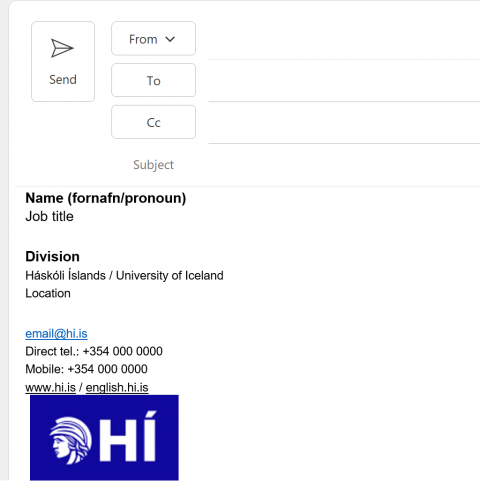
- When you write your next email, the signature should appear automatically:
This video provided by Microsoft, shows you how to create an email signature. Additional training videos on can be found here: Outlook video training
Here you find instructions for creating an email signature in Outlook for MacOS.
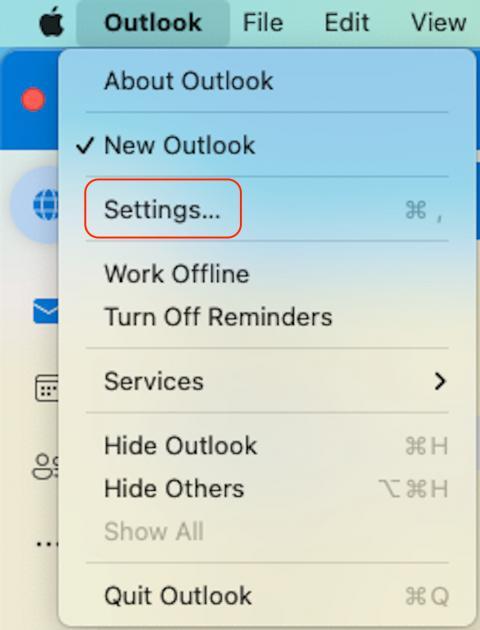
- Open Outlook and click "Outlook" in the top left corner. Select "Preferences" or "Settings":
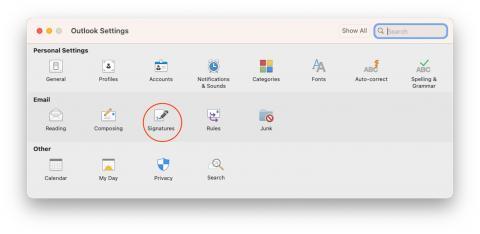
- Click "Signatures":
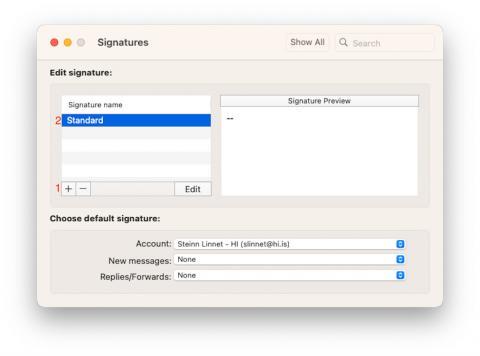
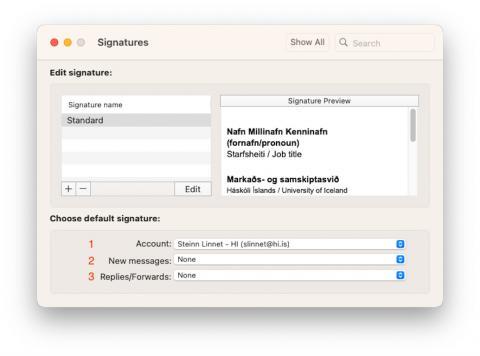
- Click the plus sign in the left corner to create a new signature. Double-click the name to change it and give the signature a descriptive title. Next, type your signature into the "Signature" window. Select the applicable account under "Account". Select the title of the signature you just created for "New messages" and "Replies/forwards". As you can see, it is possible to have different signatures for regular (new) messages and for replies and forwards
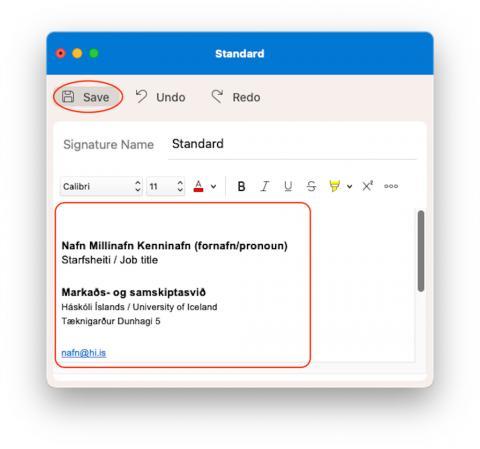
- Next, type your signature into the "Signature" window. Employees make sure you follow the design standards stipulated by UI. All you need to do is copy the standard and change your name, title, and so forth. Click on Save once the signature is ready:
- Select your account under "Account" (1). Then select the signature you want to use under "New messages" (2) and "Replies/Forwards" (3). As you can see it is possible to have different signatures for regular (new) messages and for replies and forwards:
- Close the window.
Here you find instructions for creating an email signature in Outlook for Android devices.
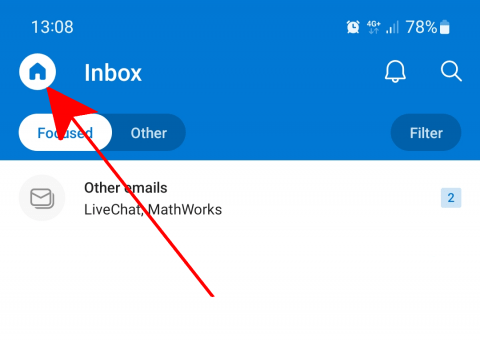
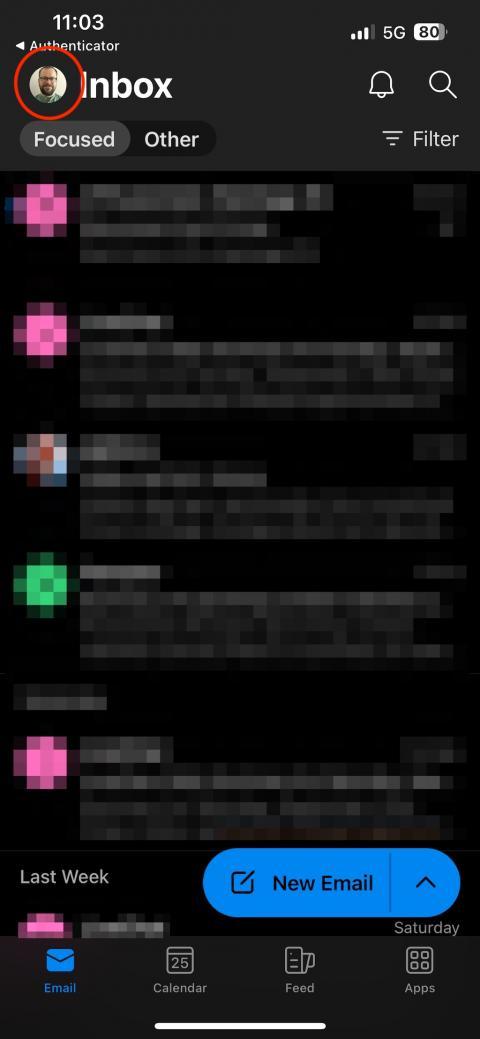
- Open Outlook on your device. Tap the icon in the top left corner:
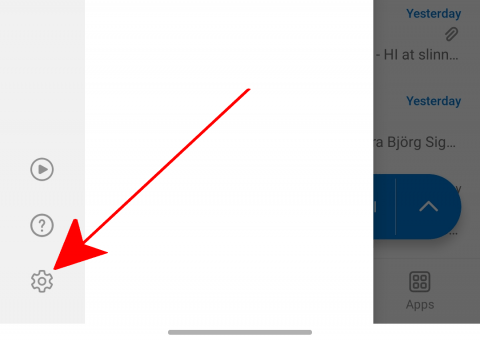
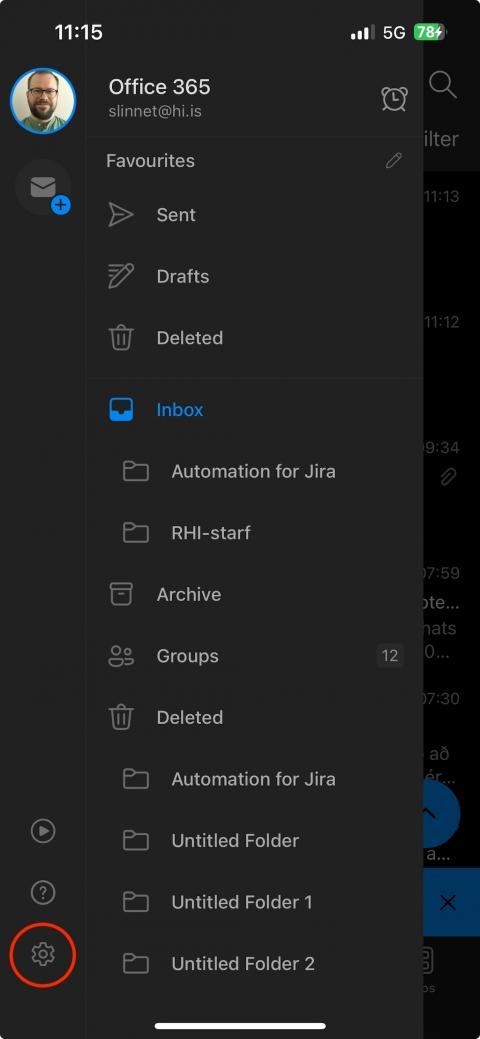
- Next, tap the gear wheel icon in the bottom left corner:
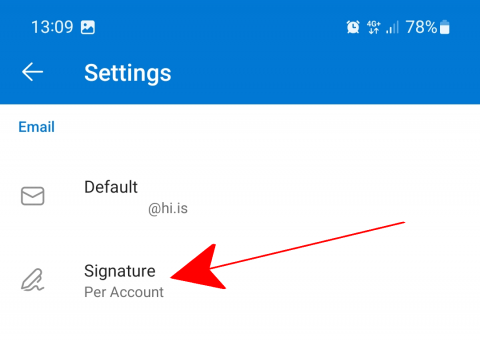
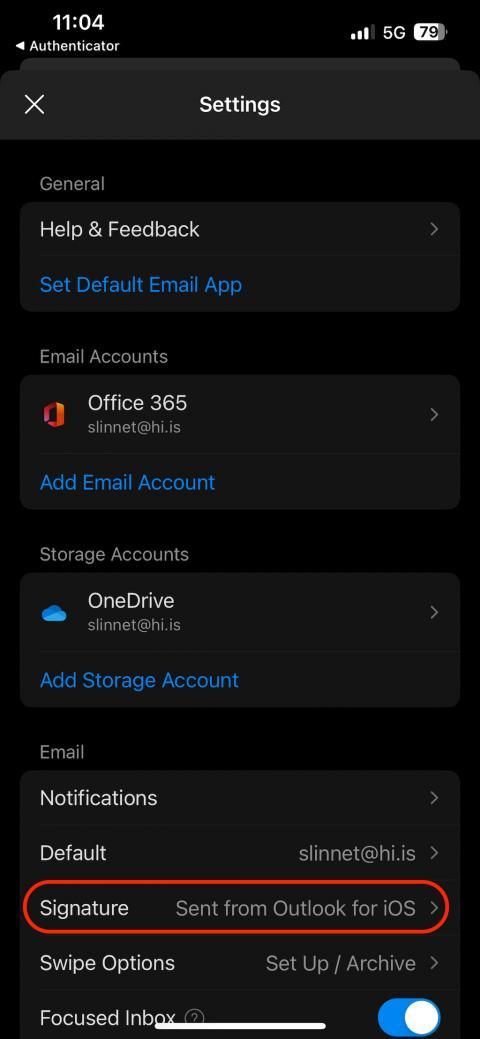
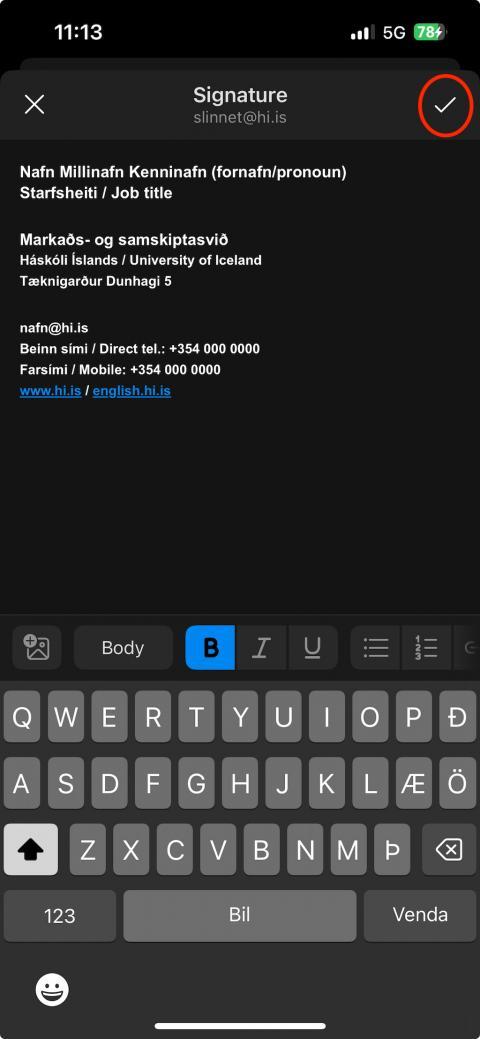
- Tap "Signature":
- Here you can enter a new signature or remove it. Tap the tick mark in the top right corner once you are satisfied with your signature. The signature will now appear next time you write and send an email:

Your signature does not automatically sync from Outlook on your computer with the Outlook app on your phone. It is, therefore, necessary to create a signature for all devices you use. Here you can find instructions for creating an email signature in Outlook for iPhone and iPad.
- Open Outlook on your device. Tap the icon in the top left corner:
- Tap the gear wheel icon at the bottom left:
- Select "Signature" from the list:
- Tap on the default signature:
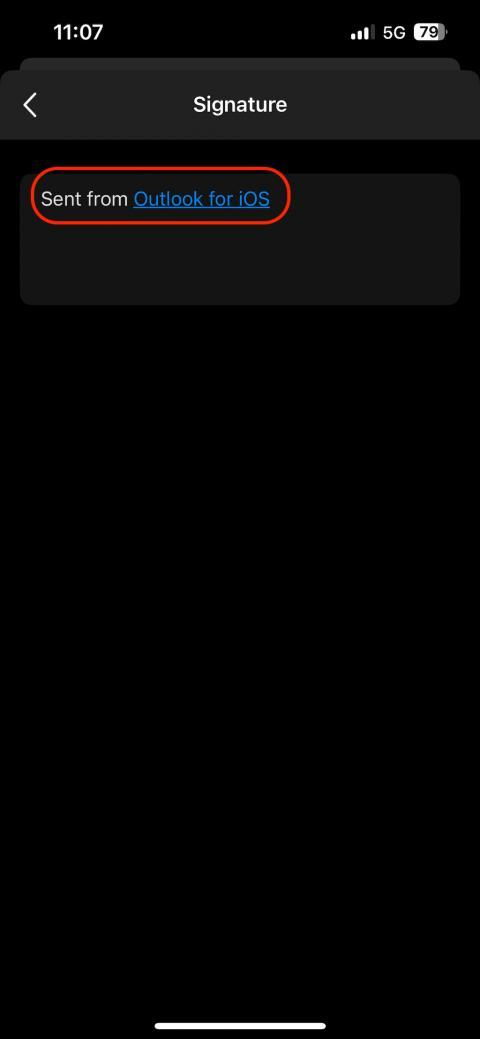
- Type the signature as you wish it to appear in emails send from this device. It is possible to save time by finding an email that has been sent from your computer and which has a good signature attached and simply copy/paste the signature here:
- Employees make sure you follow the design standards stipulated by UI. All you need to do is copy the standard and change your name, title, and so forth.
Here you find instructions for creating an email signature in Outlook in webmail.
- Open your browser and go to outlook.hi.is. Click on the gear wheel in the top right corner:
-
Click "Mail" and "Compose and reply" in the left column. Now you can create a signature that suits your purpose. Type your signature into the large box. You can adjust the font and size to your liking. Click the image icon if you wish to add an image.Tick the box next to "Automatically include my signature on new messages that I compose" to attach the signature to new messages. If you want the signature also to appear for replies and forwards, tick the box next to "Automatically include my signature on messages I forward or reply to". Last, click "Save" at the bottom when you are done. Make sure you follow the standards stipulated by UI. Signature standards for UI staff can be found at the link. All you need to do is copy the standard and change your name, title, and so forth: UI design standard - signatures:

Shared mailboxes
If your department or group needs a shared mailbox please create a ticket throught the IT Service Portal, we need these information to create a shared mailbox:
- Name of the shared mailbox
- Email of the shared mailbox
- Usernames of those that should have access to the shared mailbox
If you need to add a new user to the shared mailbox or remove a user from it after it has been created then create a ticket throught the IT Service Portal, the mail has to come from the mailbox itself or from someone that already has access to the mailbox.
The email has to include:
- The email of the shared mailbox
- Username of those you want to add or remove from the shared mailbox
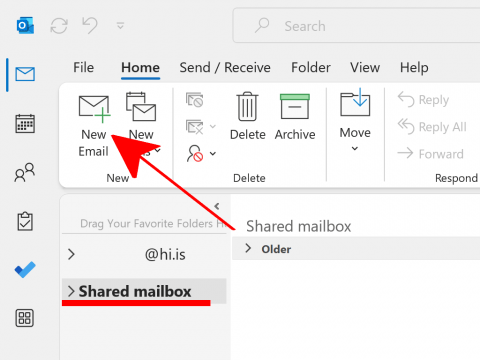
- If you are using the Outlook client in Windows the shared mailbox should automatically appear after you've been added to it.
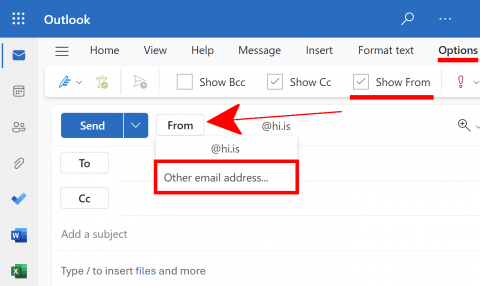
- To send in the name of the shared mailbox go to "New Email".
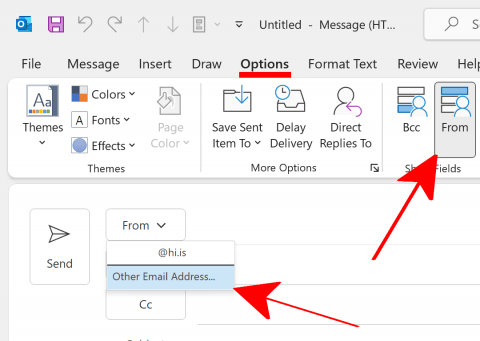
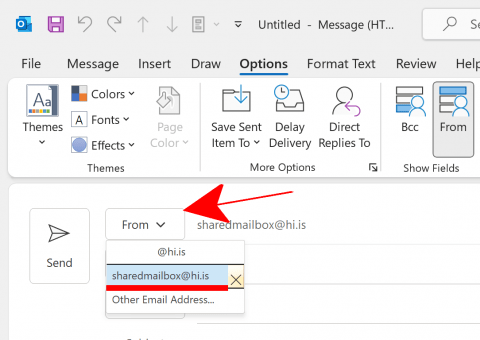
- Click "From" and go to "Other Email Address...". If from is not visible go to Options and click "From".
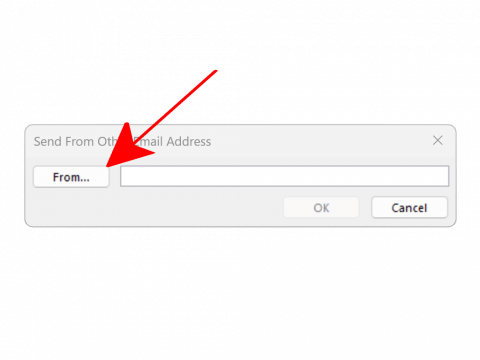
- Click "From...".
- Write the name of the shared mailbox, choose it and click "OK". Choose "more columns" if you want to search for the email instead.
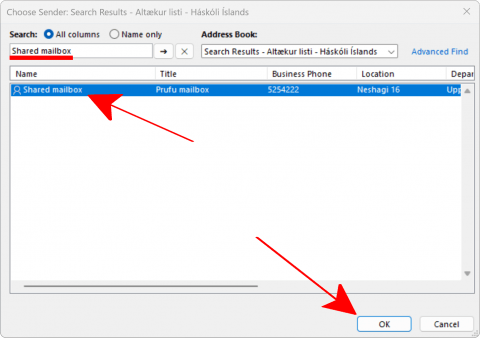
- Click "OK".
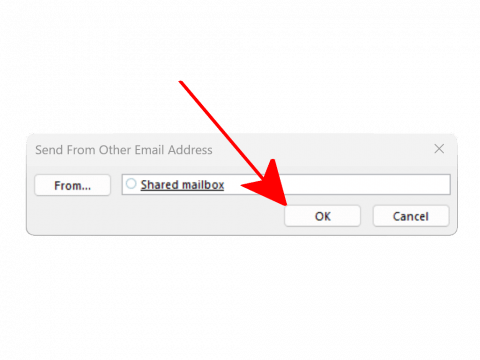
- Now you can choose if you want to send from your mailbox or the shared mailbox.
Shared mailboxwes are not visible by default in Outlook on macOS. You need to add the shared mailbox manually in order to see it.
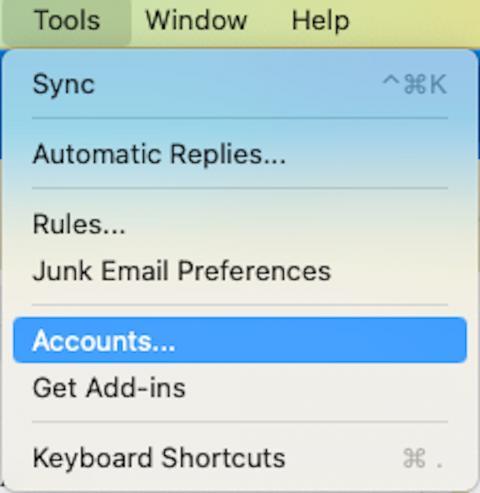
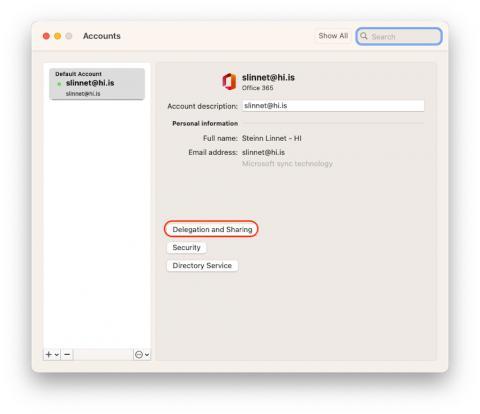
- Go to "Tools" and "Accounts..."
- Click on "Delegation and Sharing."
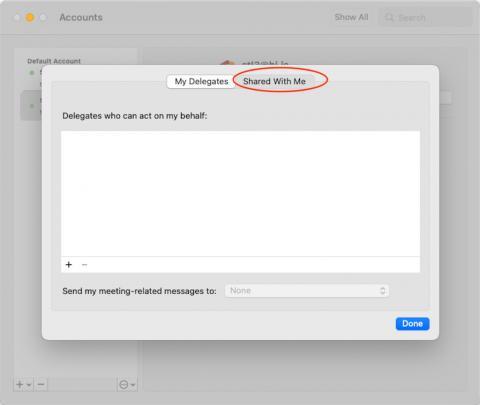
- Go to "Shared With Me" and click the plus button in the bottom left.
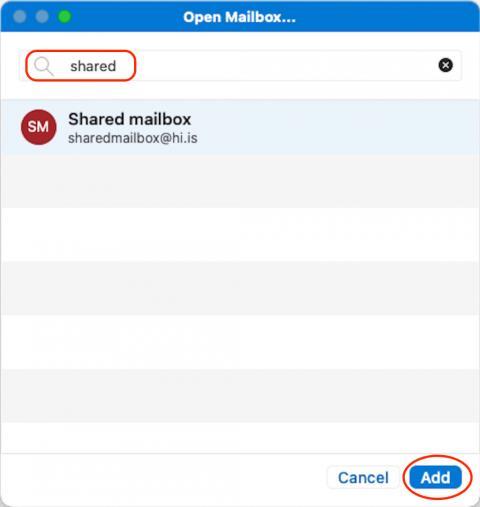
- Type in the name or email of the shared mailbox, select it and click "Add."
- Click on Done.
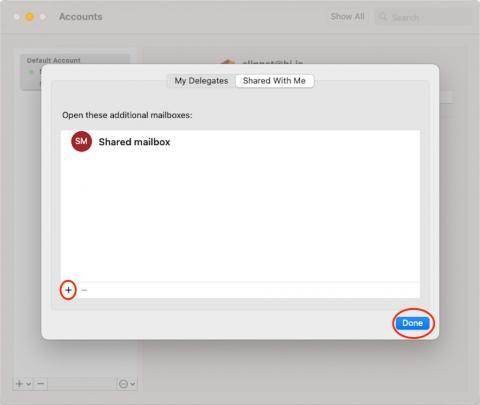
- The shared mailbox should now be visible in the left sidebar in Outlook.
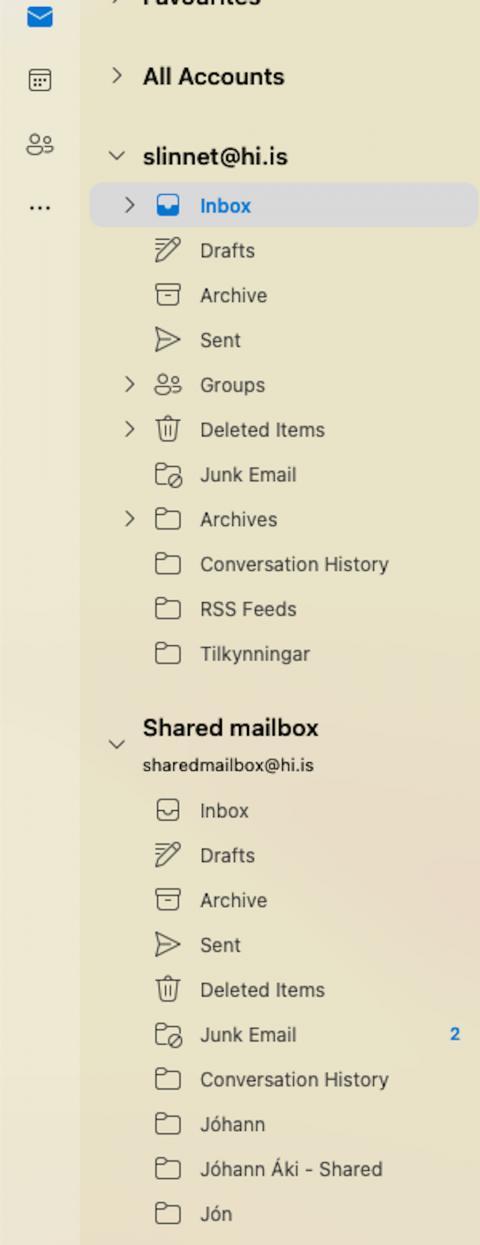
To add a shared mailbox to Outlook online that you have access to go to outlook.hi.is
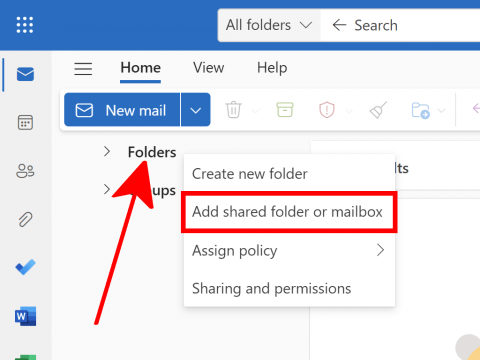
- Right click on "Folders" and choose "Add shared folder"
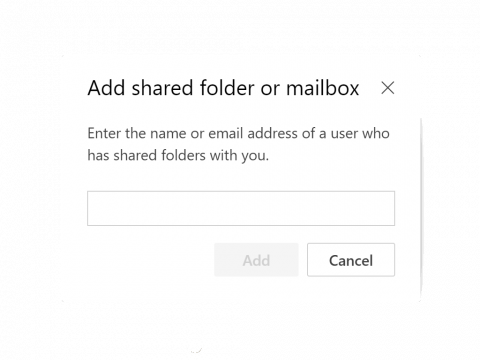
- Write the name or email of the shared mailbox in the field and click "Add"
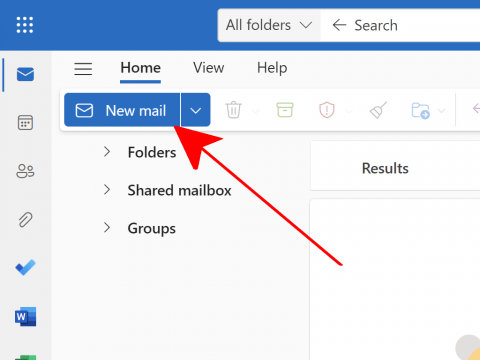
- Now you should see the shared mailbox in the folder pane. To be able to send from the shared mailbox click "New message"
- Select options and check "Show From"
- Click "From" and "Other email address...":
- Write the email or name of the shared mailbox, after you've sent from the shared mailbox once you can switch between your email and the shared mailbox by clicking "From"
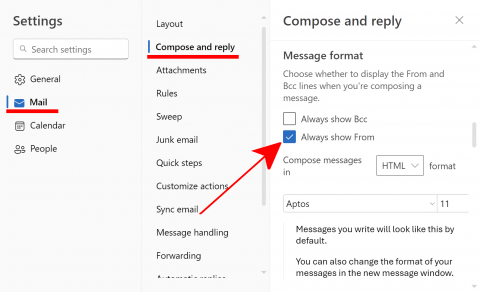
- To keep the „From“ button from disappearing click on the gear:
- Go to „Compose and reply“ and check the „Always show From“ box, then click „Save“
Sometimes you need to set rules, automatic reply or other settings to a shared mailbox. You can go directly into a shared mailbox online by going to http://outlook.hi.is/sharedmailbox@hi.is/, make sure you change sharedmailbox@hi.is to the email of your shared mailbox. You login with your University email and password, then you are in the shared mailbox and can change the settings.
Another way is to click on your name and select "open another mailbox" and entering the email address.
You can now follow the instructions on this page for creating rules on the web.
It is possible to add shared mailboxes to the outlook app.
- Tap the top left icon:
- Tap the plus sign:
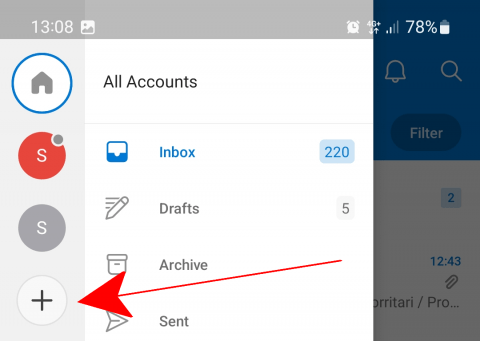
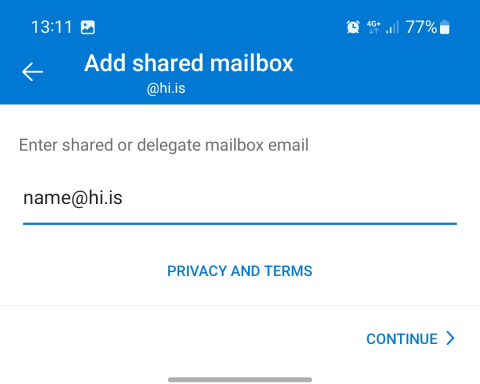
- Tap "Add shared mailbox
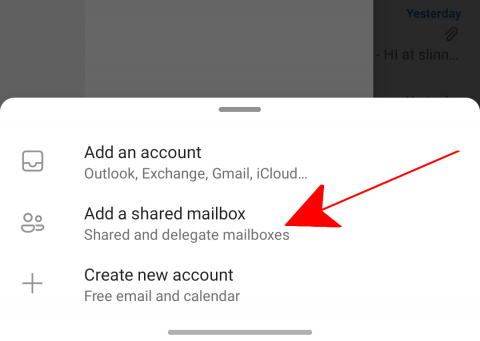
- Write in the name of the shared mailbox and tap "Continue". The shared mailbox should now be visible by tapping the top left icon.
Common issues
Here are several ways on how to fix Outlook sync issues:
Route 1: Restart Outlook by right clicking on the icon in taskbar and select "Close windows/s".
Route 2:
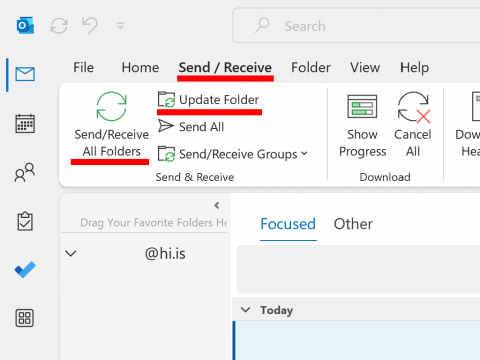
- Select the "Send / Receive" tab.
- Click on "Send/Receive All Folders" and "Update folder"
Route 3: Before going this route it might be a good idea to copy the Outbox messages as they will be deleted.
- Click on "File" tab.
- Select "Account settings" twice:
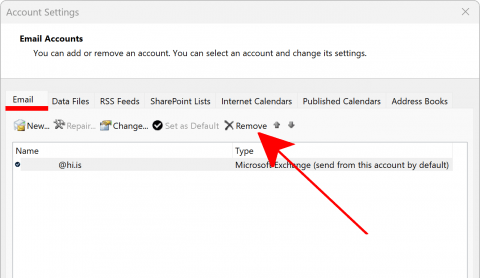
- In the "Email" tab select your email account and click on "Remove" and then add it again under "New..."
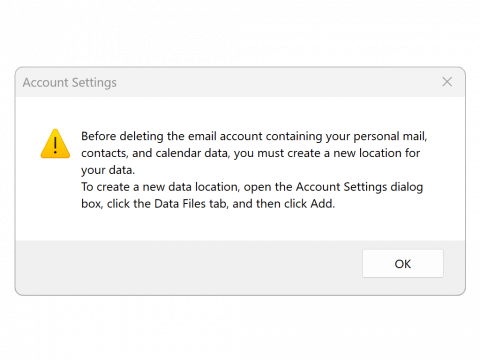
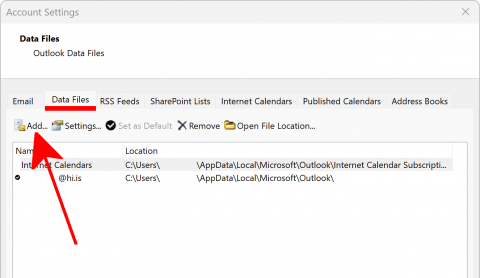
- If you get a message saying that you need to create a "Data File" then select OK and go to the "Data File" tab:
- Click on "Add..." and save the file, you can delete it later:
- Now repeat step 3.
Here you can see how to fix sync issues in Outlook on MacOS:
Option 1. Select "Tools" and then "Sync"

Option 2.
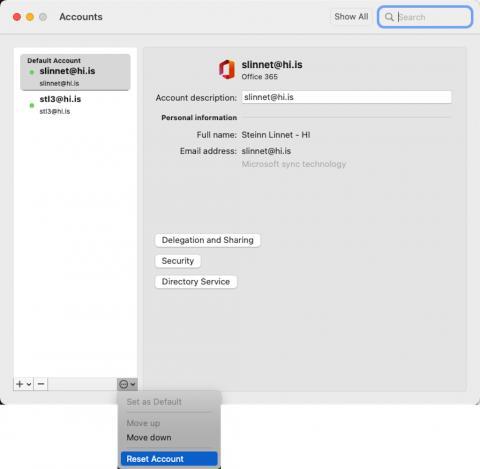
- Select "Tools" and then "Accounts"

- In the bottom left there is a + and - button, on the right side of those buttons there is a three dot or gear button that you press. Then select "Reset Account"
Option 3. It might be a good idea to copy the Outbox (unsent mail) messages since they will be deleted.
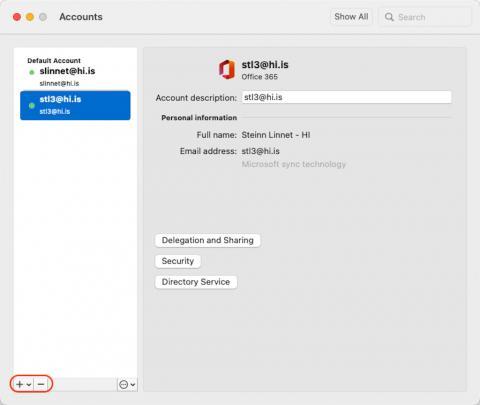
- Under "Tools" and "Accounts" select the minus button to remove the account and then plus to add it back.
If Outlook wont open or if it is stuck on the splash screen then you can try the following. We assume that you have already tried restarting the app, closing it in "Task manager" or restarting the computer.
Route 1:
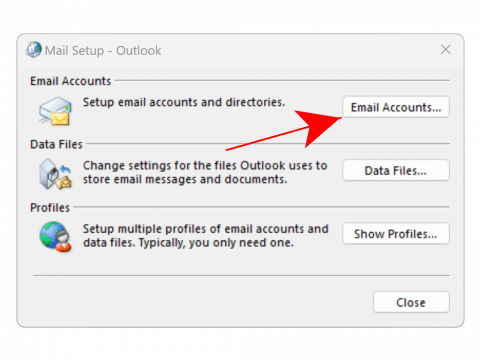
- Open the control panel. Search for and select Mail:

- Click on "Email accounts...":
- In the "Email" tab select your email account and click on "Remove" and then add it again under "New..."
- If you get a message saying that you need to create a "Data File" then select OK and go to the "Data File" tab:
- Click on "Add..." and save the file, you can delete it later:
- Now repeat step 3.
Route 2:
- Close every Microsoft 365 app (Word, Excel, PowerPoint, Outlook etc.)
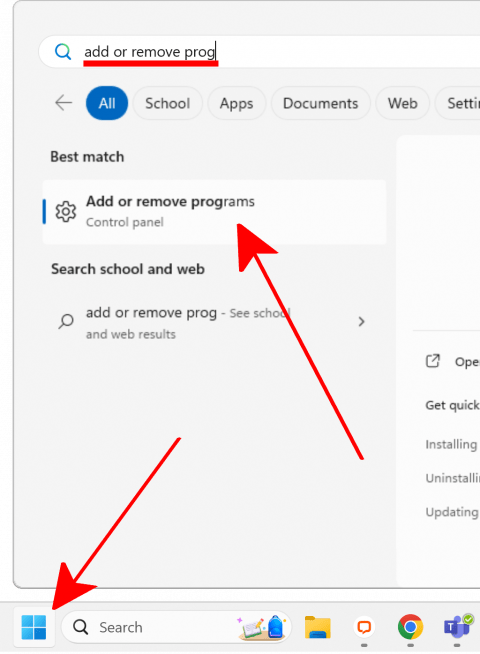
- Open the start menu. Type "Add or remove programs" and select it.
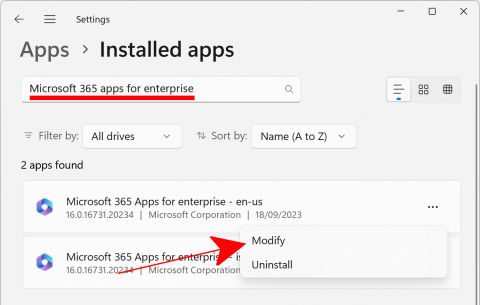
- Search for "Microsoft 365 apps for enterprise". Click on the three dots and select "Modify":
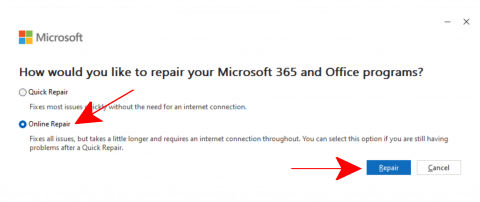
- Select "Online Repair" and repair. Once the repair is done try reopening Outlook.
Route 3:
- Close every Microsoft 365 app (Word, Excel, PowerPoint, Outlook etc.)
- Open the start menu. Type "Add or remove programs" and select it.
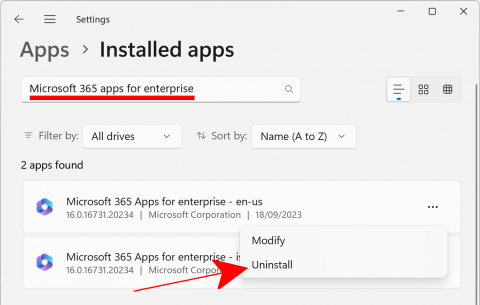
- Search for "Microsoft 365 apps for enterprise". Click on the three dots and select "Uninstall"
- Now try reinstalling Microsoft 365