Home internet connection
The Division of IT offers all members of the University a home connection through the University network (HInet).
If you choose to connect to HInet, your data will be routed through the University.
Students living in Student Housing (Stúdentagarðar) have access to free Internet by cable. Residents of Saga receive a router with the apartment that is ready to connect to the internet. Other residents will need to either buy a router or connect a single device with a cable using the instructions bellow.
When connecting through HInet you must follow the Acceptable Use Policy.
Student housing internet
- Contact Student Housing and give them your Kennitala/username to get internet in your appartment.
- It is worth noting that Icelandic Student Services sends information about new tenants after 1pm and 6pm every day and only then is it be possible to connect to the Internet if you are a new tenant.
- Residents of Saga receive a router that is ready to connect to the internet. Other residents will need to either buy a router or connect a single device with a cable using the instructions bellow.
It is worth noting that Icelandic Student Services sends information about new tenants after 1pm and 6pm every day and only then is it be possible to connect to the Internet if you are a new tenant.
To connect your router to the internet you must register the routers WAN MAC address. Please note that the MAC address on the sticker is not necessarily the same as the WAN MAC address.
- Start by connecting your device to the router either with an ethernet cable or wirelessly.
- Wireless: Connect the ethernet cable to the WAN port on the router and connect the other end to the wall. Next connect to the routers Wi-Fi network. The name and password is usually written on the sticker underneath. It does not matter that there is no internet.
- Wired: Connect the ethernet cable to one of the LAN ports and the other end to your computer.
- Find the router’s IP number and insert it into a browser.
- Most often the IP number or website is written down on the sticker that is on the router. It can also be found in the instructions. The IP number or website will look like 192.168.1.1 or https://tplinkwifi.net/
- You can also open "Command Prompt" on Windows and write "ipconfig", The ip number will appear under "Default gateway if connected by wire.
- Log in with the username and password thats written on the router’s sticker or check the routers instructions. Usually it is admin and admin.
- The username is usually "admin"
- The password is usually "admin" or "1234"
- You can factory reset the router to activate the original password.
- Locate the WAN MAC address. Often it is under the “Internet” or “Status” tab. The address should be almost the same as the one on the router label except for the last 1-2 digits.
- Register the WAN MAC address in Ugla. You can find the application under Home > Computing services > Applications > Internet access on campus.
- You need to wait for one hour before the MAC address is active in the system. After one hour the internet connection should be operational. If not, try restarting the router disconnecting it from power and then reconnecting it.
- If a message appears that says your not registered in student housing then you need to contact Student Housing and ask for internet by giving them your Kennitala/username.
- If a message appears that says the MAC address appears to be wireless then you need to check if the router is set to routing mode instead of bridge mode. You can also try factory resetting it and see if the WAN MAC address has changed in the settings.
Connecting the router to the internet:
- Connect the ethernet cable to the WAN port on the router and connect the other end to the port on the wall. Please note that only one wall port is enabled so you may need to try more than one.
- Now you should be connected to the internet.
If you do not have a router you can also set up a wired connection for one computer directly.
- Start by locating the MAC address of the computer.
- After finding the MAC Address you need to register it in Ugla. Go to Home > Computing services > Applications > Internet access on campus.
- Write in the MAC address and finish the application. It will take one hour for the computer to be registered in the system and you can only register one device.
- If a message appears that says your not registered in student housing then you need to contact Student Housing and ask for internet by giving them your Kennitala/username.
- Please note that only one wall port is enabled in the apartment so you may need to try more than one.
If you experience the Student housing connection has been cut off there are some things you can check:
- The traffic has been limited due to virus infection or too much out/in traffic, in this case you will receive an e-mail regarding the limitation from netmenn@hi.is.
- If you live in Saga or somewhere else where the router was provided by student housing and you believe the problem is with the router then you can contact Student Housing. The problem could be that the password written on the router is incorrect.
- It is possible that the wrong WAN MAC address is registered (residents at Saga do not need to bother with this). Make sure to register the WAN MAC address of the router or the Ethernet card mac address (not wireless) if you are not using a router.
- If a message appears that says the MAC address appears to be wireless then you need to check if the router is set to routing mode instead of bridge mode. You can also try factory resetting it and see if the WAN MAC address has changed in the settings.
- Make sure you are registered for the apartment by contacting Student Housing.
- If a message appears that says your not registered in student housing then you need to contact Student Housing and ask for internet by giving them your Kennitala/username.
- If you just moved between student appartments then the internet might still be registered to the old apartment.
- Make sure the net card is not adjusted for a fixed IP address.
- Turn off the Firewall e.g. Zone alarm, Norton or Trend PC-cillin because they tend to stop the traffic.
- Use an undamaged and recognized net cable.
- Make sure the net card is working properly and the drivers have been installed.
- Only one ethernet port is enabled in the apartment so try the others.
If you are still not connected to the Internet after checking the list above you can contact Student Housing or the IT Help Desk through the IT Service Portal or by phone 525-4222.
Home connection
The application page for the internet home connection can be found through Ugla under Home > Computing services > Applications > Internet home connection.
- Students can apply for a connection through Síminn.
- Staff can choose between Síminn or Gagnaveitu Reykjavíkur (Ljósleiðarinn). Síminn uses a connection from Míla however they might connect you through Gagnaveitu Reykjavíkur if Míla is not available.
- You need to have a direct line from Síminn (Míla) or Gagnaveita Reykjavíkur (Ljósleiðarinn) to be able to connect through the university.
- If you choose Síminn then you will receive a username and password that you will need to write down. This username and password is used to set up the router.
- Remember to cancel the previous internet connection from your previous provider.
- Users that order the service from Gagnaveitu Reykjavíkur (Ljósleiðarinn) without a fiber connection can expect a visit from a GR contractor free of charge who will connect the apartment to fiber. The contractor will let you choose the location of the fiber box.
- Gagnaveitu Reykjavíkur (Ljósleiðarinn) aims to deliver the service within 15 days but that is not a guarantee.
- The employees department is charged a connection fee that is seperate to the other costs that the user has to pay. The connection fee price can be seen on the IT Division price list.
- The user needs to pay a line fee. Seek out the pricelist from the network provider.
- The user needs to pay a data transfer fee. Seek out the pricelist from the network provider.
- Data:
- Síminn: It is necessary to pay for an internet package. We can not gurantee wether the data gets counted or not.
- Gagnaveita Reykjavíkur (Ljósleiðarinn): The data is unlimited.
- The user needs to provide a router.
These instructions do not apply for connections through Gagnaveitu Reykjavíkur (Ljósleiðarinn). Síminn uses fiber from Míla however when a connection through Míla is not available they might connect the user through Gagnaveitu Reykjavíkur (ljósleiðarinn).
Here are general instructions that shows how you connect you router to the internet through Síminn.
- Start by connecting your device to the router either with an ethernet cable or wirelessly.
- Wireless: Connect the ethernet cable to the WAN port on the router and connect the other end to the wall. Next connect to the routers Wi-Fi network. The name and password is usually written on the sticker underneath. It does not matter that there is no internet.
- Wired: Connect the ethernet cable to one of the LAN ports and the other end to your computer.
- Find the router’s IP number and insert it into a browser.
- Most often the IP number or website is written down on the sticker that is on the router. It can also be found in the instructions. The IP number or website will look like 192.168.1.254 or 192.168.1.1 or 10.0.0.138.
- You can also open the "Command Prompt" on Windows and write "ipconfig", The ip number will appear under "Default gateway if connected by wire.
- You will now be asked for a username and password. The username and password could be admin, epicrouter or 1234. This information might be in the instructions or written on the sticker on the router.
- Now you have accessed the routers dashboard. Here you will need to select "Set Up" or "Wizard".
- Under "Operating mode" select "Routing mode" and under "Connection type" select "PPPoE"
- Sometimes you may need to enter additional settings: VPI (0 or 8), VCI (33, 35 or 48), Encapsulation (PPPoE or PPPoA), Framing (LLC or VC Mux). Your phone company provides you with this information.
- Internet Service Provider (ISP): Here you enter the username and password you were given when you sent in the application. The username should be the first half of your email with either @nemendur.hi.is if you are a student or @starfsm.hi.is if you are a member of staff behind it.
You should not have to change any further settings. Remember to save the settings.
These instructions do not apply for connections through Gagnaveitu Reykjavíkur (Ljósleiðarinn). Síminn uses fiber from Míla however when a connection through Míla is not available they might connect the user through Gagnaveitu Reykjavíkur (ljósleiðarinn).
Here you can see how to connect a router from Síminn.
- Start by connecting your device to the router either with an ethernet cable or wirelessly.
- Wireless: Connect the ethernet cable to the WAN port on the router and connect the other end to the wall. Next connect to the routers Wi-Fi network. The name and password is usually written on the sticker underneath. It does not matter that there is no internet.
- Wired: Connect the ethernet cable to one of the LAN ports and the other end to your computer.
- Find the router’s IP number and insert it into a browser. In this case its http://192.168.1.254.
- You can find the IP address in the instructions from Síminn.
- You can also open the "Command Prompt" on Windows and write "ipconfig", The ip number will appear under "Default gateway if connected by wire.
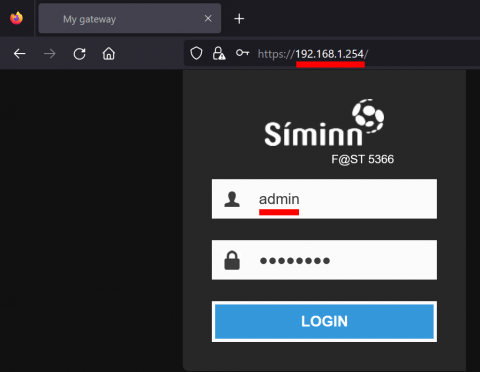
- You will now be asked for a username and password. The username is admin and the password can be found under "Access key" on the router.
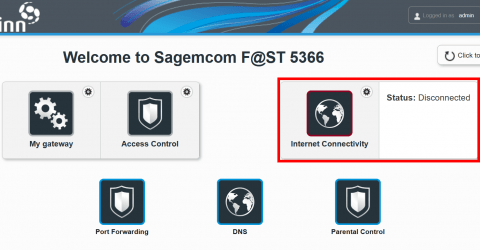
- Now you have accessed the routers dashboard. Select "Internet Connectivity".
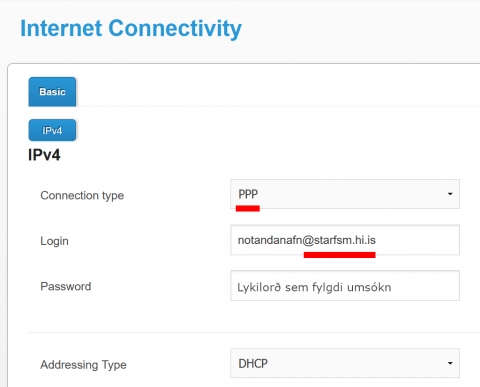
- Here you need to insert the following settings:
- Under "Connection type" select "PPP".
- Under "Login" the username should be the first half of your email with either @nemendur.hi.is if you are a student or @starfsm.hi.is if you are a member of staff behind it.
- Under "Password" you need to write the password you were given when you applied for the internet.
- And finally click on "Apply" at the bottom of the page.
- The router is now ready. You only need to connect it to the wall through the WAN port.
- When the internet service has been activated by the department of IT the user will receive a confirmation by mail.
- The user will then need to restart the fiber box and the router.
- Users that already have a fiber connection from Gagnaveitu Reykjavíkur (Ljósleiðarinn) will not get a visit from GR's contractor.
- Users that order the service from Gagnaveitu Reykjavíkur (Ljósleiðarinn) without a fiber connection can expect a visit from a GR contractor free of charge who will connect the appartment to fiber. The contractor will let you choose the location of the fiber box.
- Gagnaveitu Reykjavíkur (Ljósleiðarinn) aims to deliver the service within 15 days but that is not a guarantee.
Síminn
For Síminn you need to set up the new router by following the instructions above.
Gagnaveita Reykjavíkur (Ljósleiðarinn)
When you change the router through Gagnaveita Reykjavíkur (Ljósleiðarinn) an employee of IT needs to change some settings in GR's systems so that the new router gets assigned an IP address.
This is done manually so it is important to change the router during working hours and you need to do the following:
- Have the new router ready and make sure it has a WAN port.
- Send a message through the IT Service Portal letting us now that you are changing routers.
- IT will contact you to decide the day/time when the router can be changed.
- The new router is connected to the same port as the old router.
- The IT staff will register the MAC address of the new router into the GR system.
- The IT staff will restart the fiber box and the router will recive an IP address.
- The user can change the router settings, for example the password and wifi name.
To move your internet connection to a new address you need to do the following:
- Síminn (Míla): Have Síminn move your services to the new address and do not change any of the router settings.
- Gagnaveita Reykjavíkur (Ljósleiðarinn): Apply for the internet again. In the comments you can write when it is safe to move the connection, in other words you can specify when GR can disable the service in the old apartment and when they are save to move it to the new one.
It can take 2-3 days for the connection to be moved after you send in the application.
You can cancel your home connection through Ugla under Computing services → My services.
Below are some common problems and solutions.
If you experience a sudden loss of Internet connection, please check the following steps:
- You could be on the list for too much traffic. As an example you can go to the www.hi.is website but you are unable to browse on other websites. You need to adjust proxy settings.
- Turn the router off and leave it turned off for at least 30 seconds. Then turn it on again.
- Make sure the router is properly connected and the phone cord is undamaged.
- Is the DSL line from the phone company active? The phone company gives information on that. ADSL or Line sync light should be green.
- If you have recently changed the phone company you need to apply for ADSL again in Ugla.
- In some cases you might need to configure the router again (reset factory default settings).
- You could be on the list for virus affected computers in the University. Please contact the IT Help Desk.
If you have never been able to connect to the internet, please check the following steps:
- Is the DSL line from the phone company active yet? The phone company gives information on that. ADSL or Line sync light should be green.
- Around 3-6 hours goes by after applying for the connections before the ADSL username is active.
- You need to use the adjustments of the phone company and only fill in the username and password from the University. .
- It is imperative to use either username@starfsm.hi.is for employees or usename@nemendur.hi.is for students.
- In some cases you might need to configure the router again (reset factory default settings).
- Sometime when nothing of the above works, you need to apply for the ADSL connection again in Ugla and put in the new username and password you receive.
If the connection keeps disconnecting, please check the following steps:
- Make sure the micro filter has the right adjustments for all phone devices connected to the DSL line.
- Make sure the phone cord connecting from the wall to the router has no micro filter.
- Is the phone cord connecting to the router undamaged and the tin in the wall as well? It is advisable to change the phone cord.
- Limit the use of T- pieces, which divides the line in order to isolate failures.
- The phone companies can measure the ADSL line in people’s homes.